Posted by Kathy Torrence on May 31, 2008 in
Family Stuff,
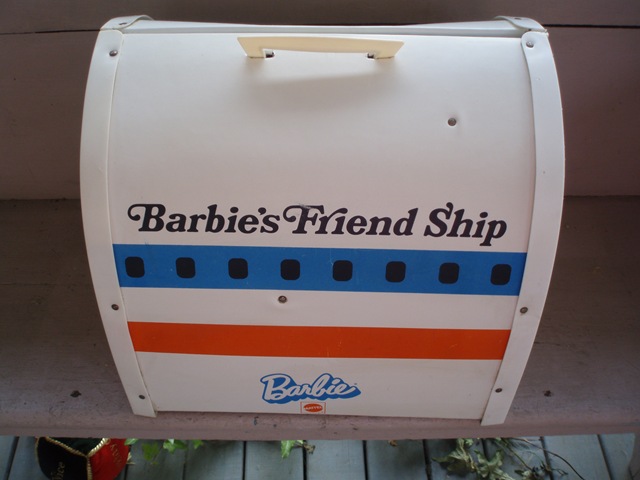
Yardsale Finds While I was out yardsale-ing yesterday, I came across this little gem from the past:
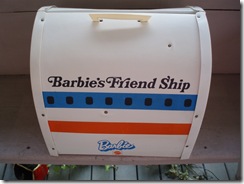
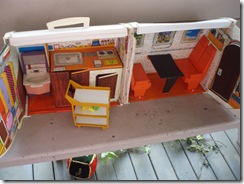
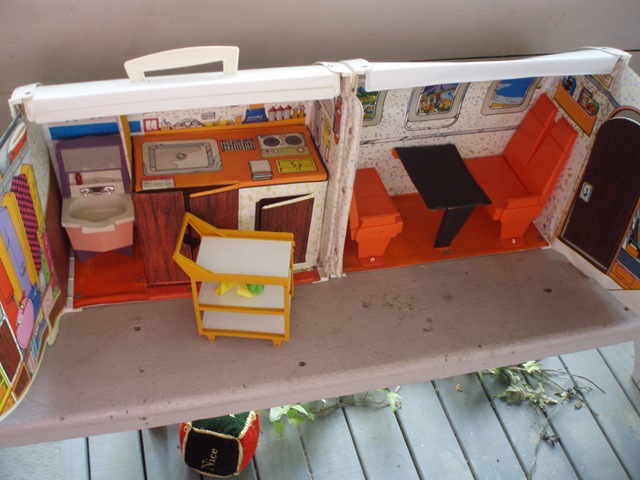
That would a “Barbie Friend Ship” fold-out airplane from about 1972. I had one of these when I was a girl and when I saw this one for $2, I decided to pick it up for Emily. It cleaned up nicely and brought back some childhood memories…
Then yesterday afternoon, I got my hair cut. I was talking with my stylist and mentioned that someone had told me at work the other day that I had “model” hair and that I just couldn’t believe that someone would actually like my hair.
The stylist and others in the salon went on to tell me that same old standard line that straight-haired people always say to people with curly hair: “Lots of people pay lots of money to have hair that looks like yours.” This usually comes along with the line, “You’re so lucky to have naturally curly hair!”.
Hmmm…
This got me thinking – straight-haired people have NO idea what it’s like to grow up with kinky, curly hair in a world where straight hair is considered the standard for beauty. Celebrities with curly hair are still forced to straighten their hair to fit in with Hollywood (Nicole Kidman, Sarah Jessica Parker, etc).
I’ve seen studies done that say that people with curly hair are not taken as seriously in the business world as those with straight hair. They’re seen as “fun and flighty” – not exactly executive material.
And I also saw recently on the Bravo show, “Millionaire Matchmaker” that the matchmaker told her curly haired women clients to straighten their hair because men don’t like curly hair. She said that men want hair “they can run their fingers through”…doesn’t sound so lucky now, does it?
And just to prove my point, I decided to take my new scanner and put together a little jaunt down memory lane inspired by my hair cut (which turned out great, by the way) and that 1972 Barbie toy. I’m going to show what it was like to grow up with naturally curly hair in the 1970s and 80s (when the only real hair product available was Dippity Doo). Keep reading if you dare, but let me warn you, some of these photos are very graphic (in a bad-hair kind of way)…
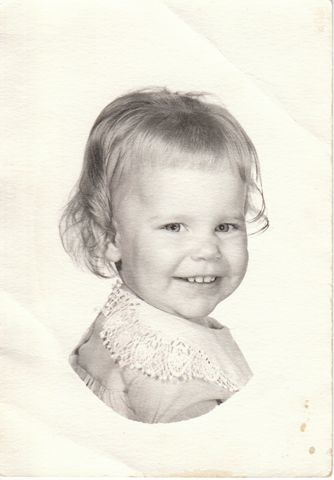
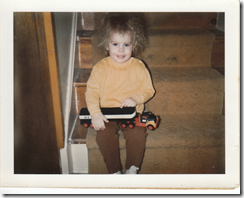
First, a sweet little baby photo…
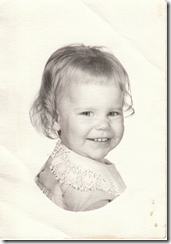
Doesn’t look so bad, right? But the curly-hair monster was always lurking not far away…
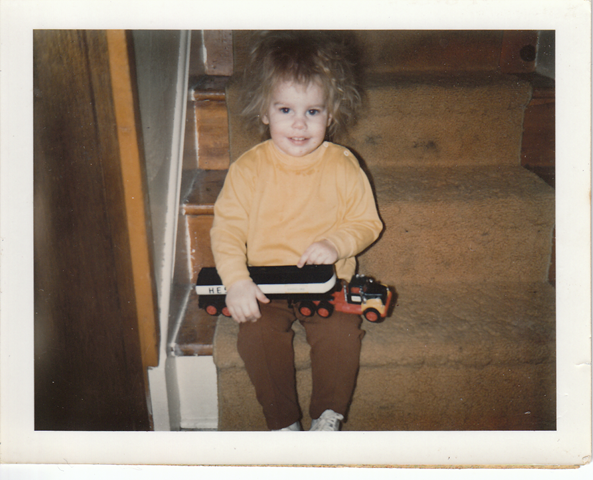
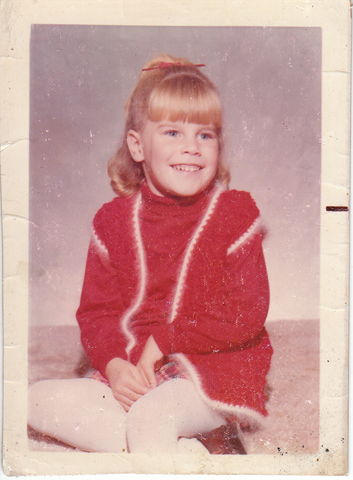
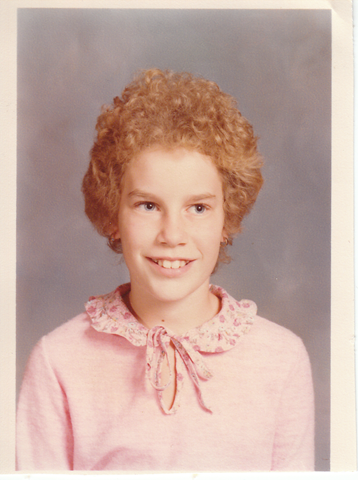
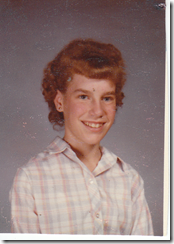
Actually, as a young child, my hair was fairly under control (relatively speaking) – take a look at these kindergarten and first grade photos:
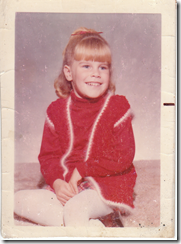

Not too bad – my bangs were even blond and shiny!
By 2nd grade, my hair started to rebel just a tiny bit:

You can see the little wisps sticking out in the back…
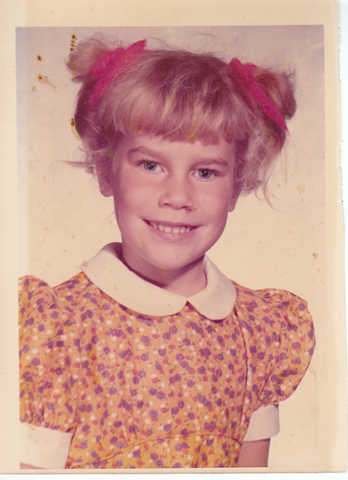
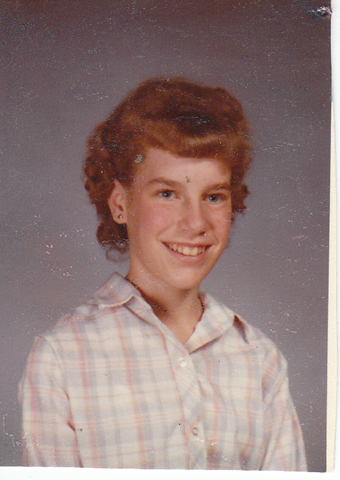
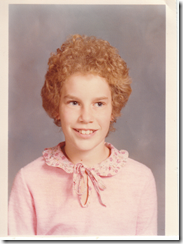
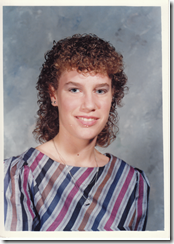
Then came third grade. Again I warn you…some of these photos are pretty graphic…
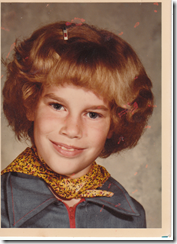
What happened here (fashion aside – what’s with the yellow scarf and zip-up jumpsuit)?!? Lesson learned – NEVER brush out curly hair after it’s dry, or you’ll end up looking like you’re wearing a helmet. But please do take note of my cute little patriotic barrette for the 1976 bicentennial…
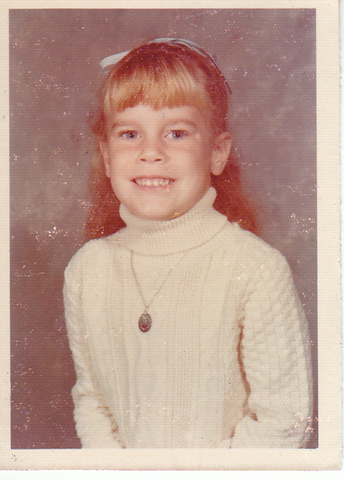
I think my mom tried to tone it down a little bit for 4th grade, but I feel that this style is slightly reminiscent of Princess Leah from Star Wars (maybe that’s the look she was going for):
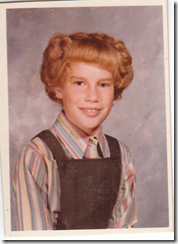
She tried to use curlers to tame the frizz, but the result was very odd…
Now for some strange reason, my mother decided to give me a perm when I turned 10. Maybe she was hoping to cancel out the natural curls with some manufactured ones? (By the way, my mother has perfectly straight hair.)
We moved to a new house in 5th grade, and so this was how I met all of the kids in my new school…looking like this:
I’m still traumatized by this hair – just the smell of perm solution brings back bad memories. The good news is that somehow, I managed to make friends in spite of this horrible hair.
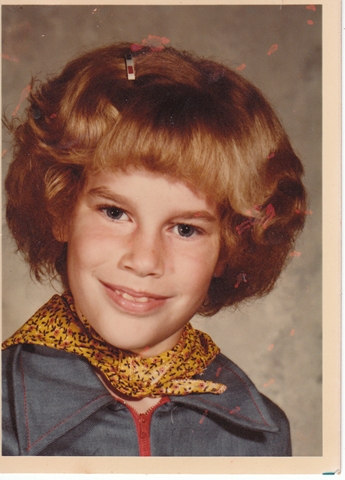
Oh…but it gets even worse, I’m afraid…take a look at 6th grade:
Um…yeah. I don’t even know what to say. More curlers and some adolescent hormones resulted in this fine, fine photo. The year here would have been about 1980 or so.
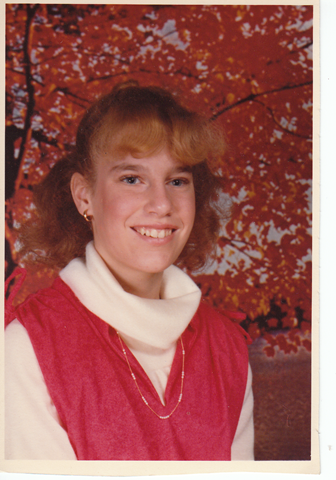
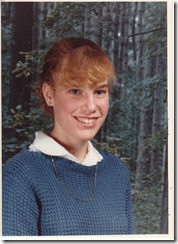
The next year, I decided to try to at least let my hair grow a little longer – and I tried some sort of weird ponytail configuration. Here’s 7th grade:
Again, let’s not even talk fashion here. Focus on the hair, please (and that’s not too hard to do).
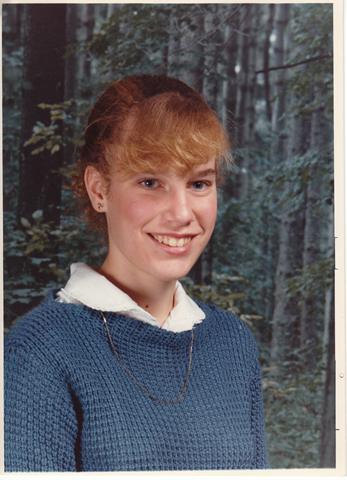
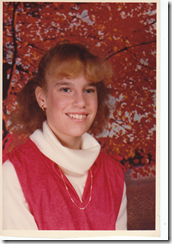
I tried something new the next year – I let it grow out and always wore it pulled back in a ponytail:
Notice my feeble attempt at ‘feathering’ my bangs – it’s as close as I could get to the Farrah Fawcett look!
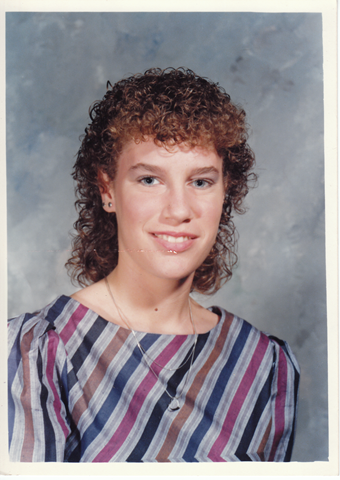
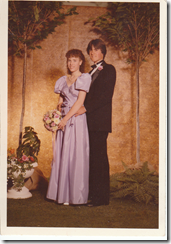
When I started high school, I tried to go a new route – I cut my hair shorter and left it curly with LOTS and LOTS of gel:
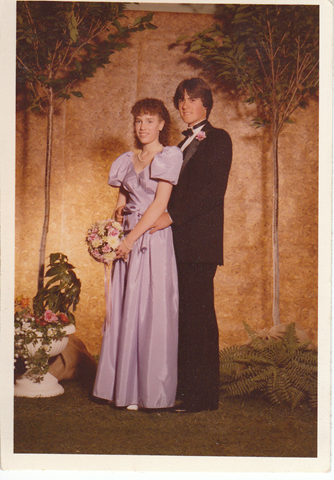
Yes, that’s right – you’re looking at a curly-haired mullet. I’m so proud! I even wore it to my boyfriend’s high school prom that way:
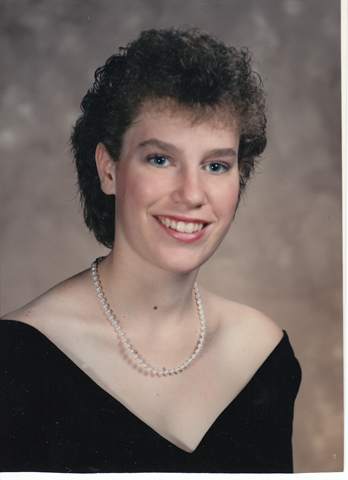
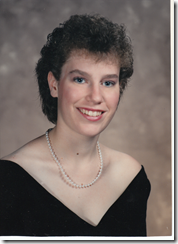
Fast forward to high school graduation – I kept my hair short and curly all through high school – it was the best I could do with my lack of curly hair knowledge and the few hair products available in 1986:
Wow. I warned you that the photos were graphic! And those are just my childhood photos – maybe if I have more time, I’ll share with you my adult hair-escapades.
Oh – and if any of you curly-heads (or non-curly heads) are brave enough to share YOUR bad childhood hair photos, please send them to me so I don’t feel so alone being traumatized by my past hair blunders…
Posted by Kathy Torrence on May 28, 2008 in
Crafts,
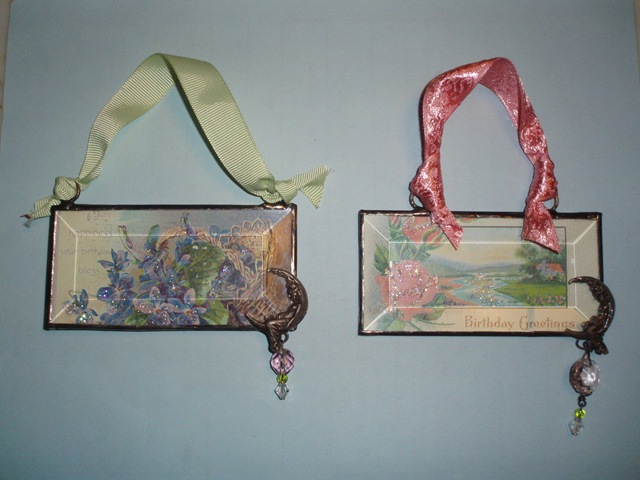
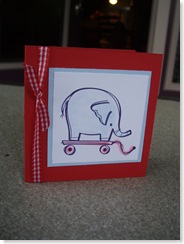
Soldered Art While we were in Cape May, I came across some pretty glass ornaments in a gift shop. They were made with beveled glass with soldered edges and each had a little collage inside – and they were selling for $45 and up! I was inspired to be creative…
I realized that it had been a long time since I played with my soldering iron and when I heard that two of my co-workers had birthdays this week, I realized that I had the perfect excuse to get started!
I made up these little “Birthday Cards Under Glass” for them:
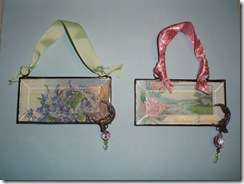
I took some vintage birthday postcards and scanned them and printed them onto white cardstock with my fancy new scanner and color laser printer that I received for my birthday. I added some glitter and put them behind a piece of beveled glass.
I tried something new with these – instead of sandwiching each collage between two pieces of glass, I taped the front piece of glass directly to a piece of patterned paper on the back (inspired by the pieces I saw in Cape May). This makes them much lighter – especially for larger pieces like these.
I added some jump rings and some lady-in-the-moon charms and beads, tied a pretty ribbon…and now I have some pretty little gifts!
Happy birthday Sybil and Shanee!
We had a wonderful Memorial Day weekend camping at Holly Shores campground in Cape May. The weather was absolutely glorious!
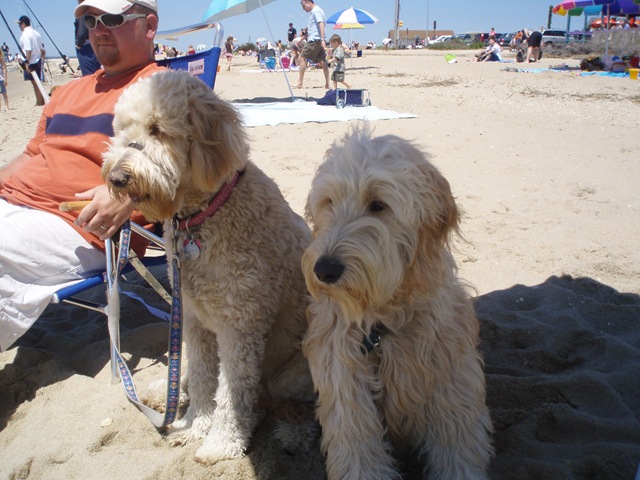
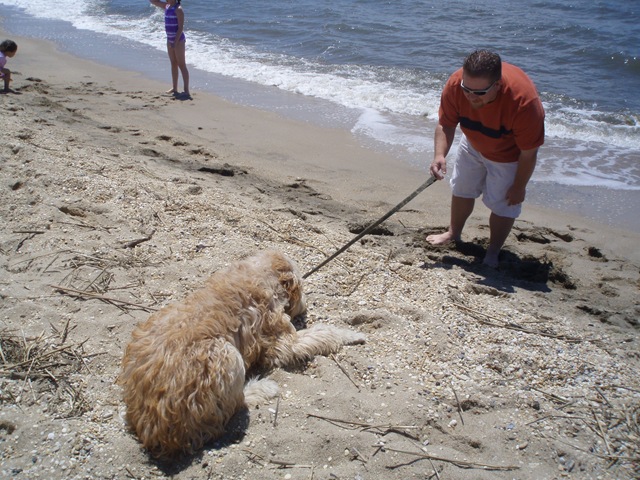
We spent some time on the beach at Sunset Beach and took the dogs with us…
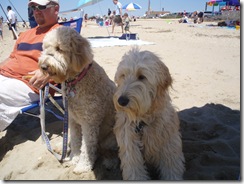
Although they weren’t crazy about the water…
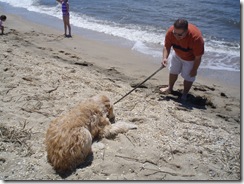
There was a dog park at the campground which was great – the dogs got lots of exercise!
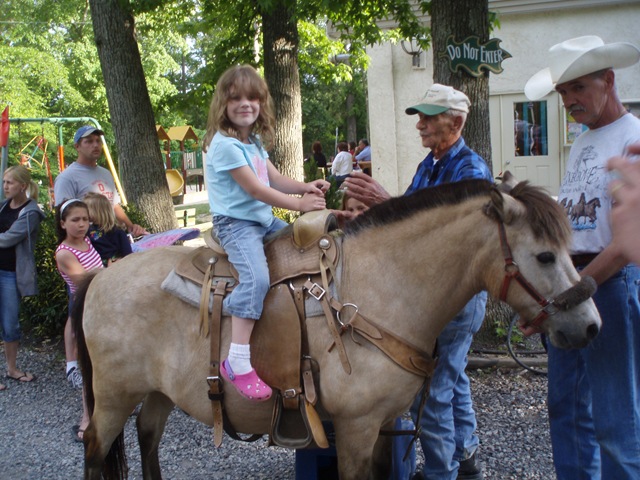
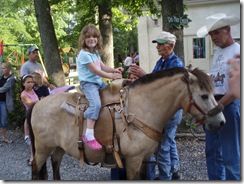
The kids had a nice time too – Emily got to ride a pony…
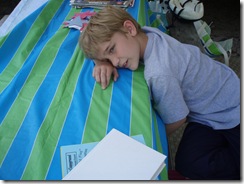
And we went on a hayride…Matt wasn’t crazy about that…
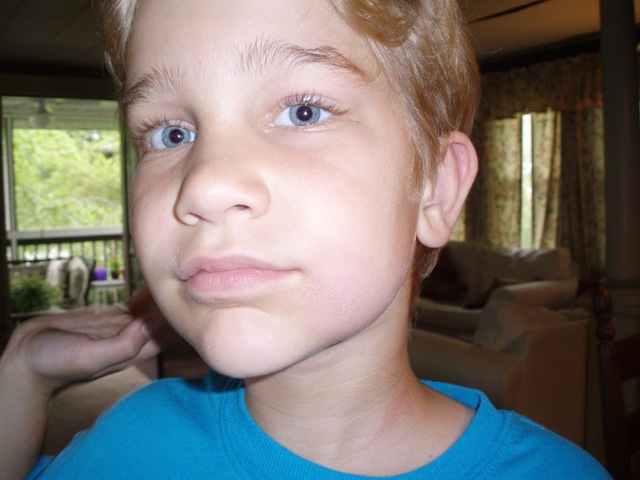
Poor Matt – at the end of the weekend, he wound up with poison ivy on his cheek! The whole side of his face was swollen – but he’s doing better now…
No more camping for another three weeks – we have lots going on at home in June…
Posted by Kathy Torrence on May 28, 2008 in
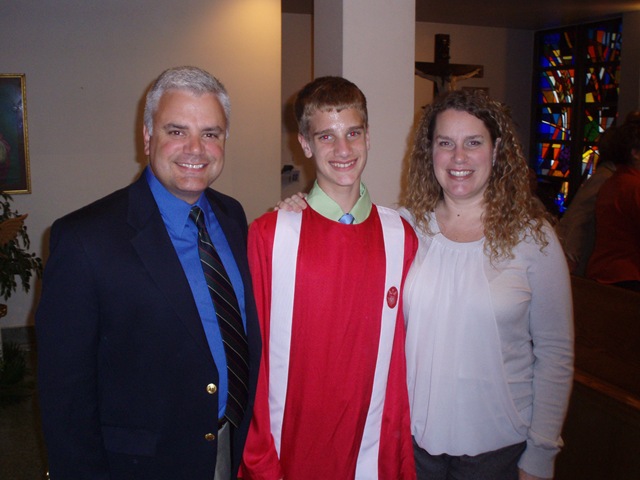
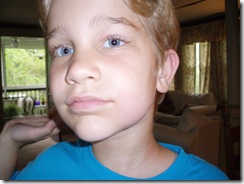
Family Stuff Andrew was confirmed early this month in a beautiful service – you’re growing up so fast, Andrew!

Here he is with his father and me – we love you!

And notice how gray Morgan’s hair is! 😉
Posted by Kathy Torrence on May 9, 2008 in
Cards,
Crafts,
Other items I think I mentioned that I did a Stampin’ Up! workshop for the first time in a long time a few weeks ago – I thought I’d share some of the projects with you.
I made up some simple demos and make-and-takes for the workshop – and I’m ashamed to say that I pretty much CASEd these directly from some Stampin’ Success magazine with some small modifications. But that’s what the magazine is there for, right? Hey – I’m a working mom now! I didn’t have time to wait for the creativity to flow that week… 🙂
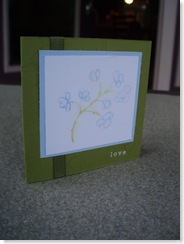
I did two small 3X3 cards to demonstrate some techniques using Stampin’ Pastels (’cause that’s what was featured in Stampin’ Success last month…).
The first card is simply colored directly with pastels and Q-tips.
The second little card uses the Poppin’ Pastels technique (stamp image in Versamark ink and use a Q-tip to rub the pastels on top of the stamped image). This card was also a make-and-take.
I also demonstrated how to use Blender Pens to color with pastels:
How to use pastels directly on accessories like the flowers in the Pretties Kit:
And how to use pastels on top of white embossing powder:
I also demo’ed how to use pastels on the edges of cardstock to create an aged effect:
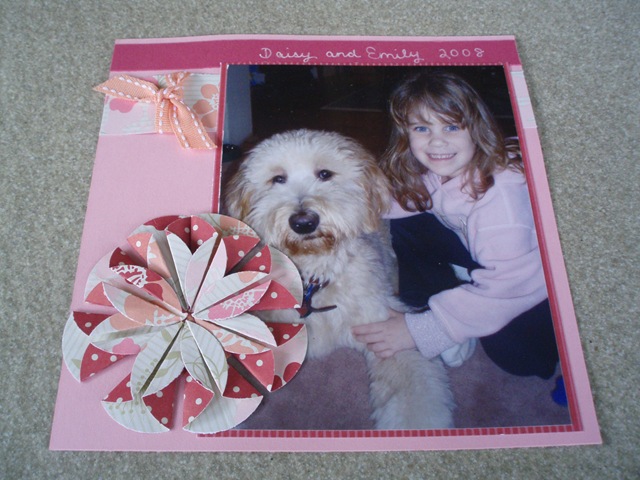
I demonstrated a scrapbook page featuring a flower made with the dahlia fold that was featured on SplitCoastStampers:
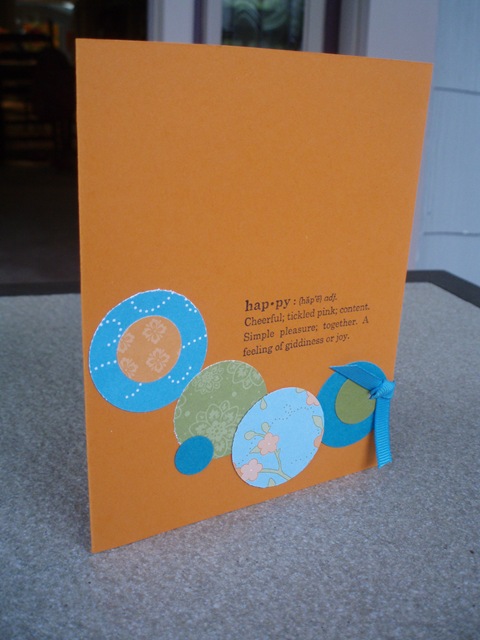
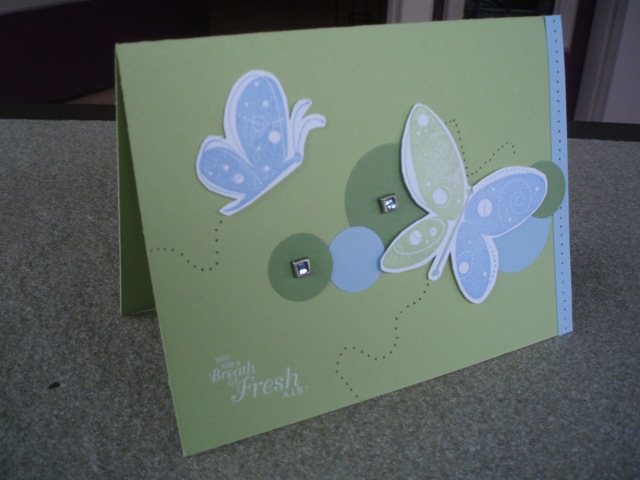
And I showed two cards that were similar to the template featured in Stampin’ Success (I know, I know…I was lazy!).
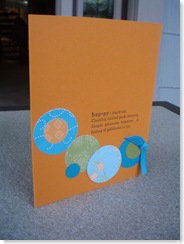
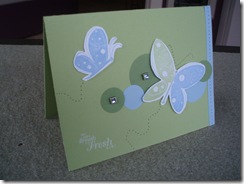
The card on the left I used as a make-and-take because it is a simple, quick and easy card to make. It’s especially nice because you can use up all of your patterned paper scraps – just punch out circles of varying sizes and make up your own design.
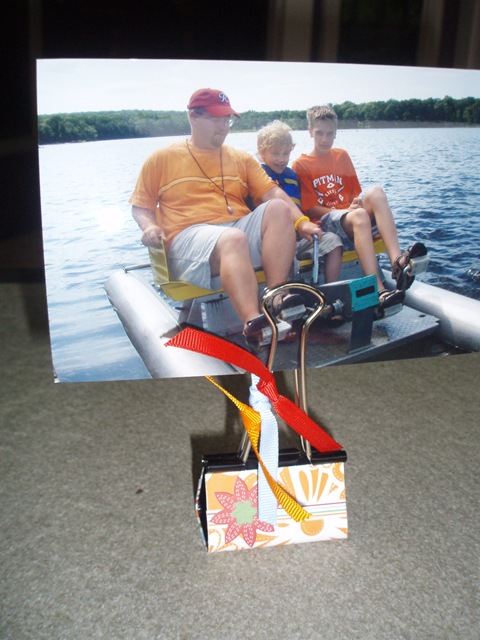
Finally, I CASEd yet another project idea from SplitCoastStampers (sorry – I’m not sure who was the very first person that came up with this idea, but I know for sure that it wasn’t me) – embellished binder clips. You can find lots of these in the SplitCoastStampers gallery. I did this as a make-and-take too:
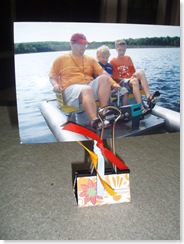
This is another quick and easy project. Start with any size binder clip and cut a piece of patterned paper to fit around the outside. For these, I used paper from the Summer Days Simply Scrappin’ Kit. Then I just added some stickers from the same kit and a few pieces of coordinating ribbon for a cute photo holder.
These were a big hit at the workshop – and even though I can’t take credit for these original ideas, I had lots of fun making them and sharing them with others – that has to count for something, doesn’t it?
Posted by Kathy Torrence on May 9, 2008 in
Cards,
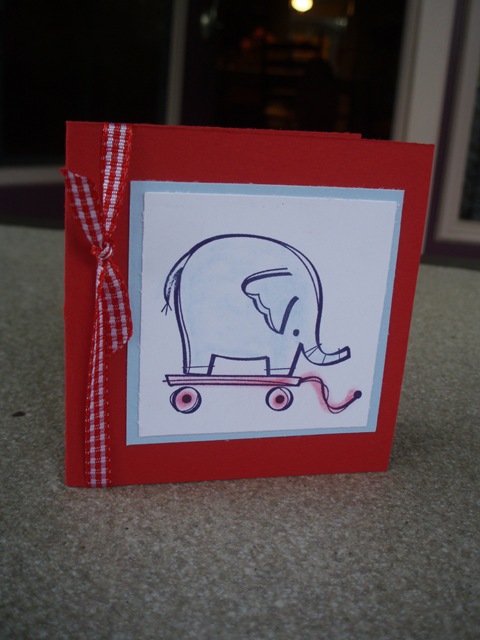
Crafts I finally had a chance to play in my craft room this morning – good thing, because Emily and I had several cards to make!
I used the "Peas Be With You" kit from Paula’s Kit Club that I received back in MARCH and haven’t had a chance to play with yet (time certainly does fly, doesn’t it?).
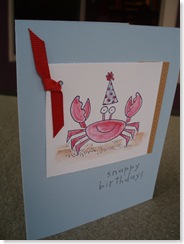
I wanted to make a thank you card for my friend Linda who not only gave me some wonderful birthday presents, but was also kind enough to let Emily and I stay with her in Florida for the weekend last month. I also wanted to make a card for her friend Judy to thank her for her kindness on my birthday as well.
NOTE – If Linda and/or Judy are reading this, don’t read ahead unless you want to see your cards before you receive them!!!
So here are the cards:
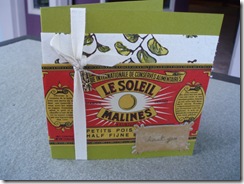
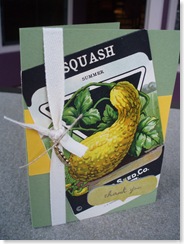
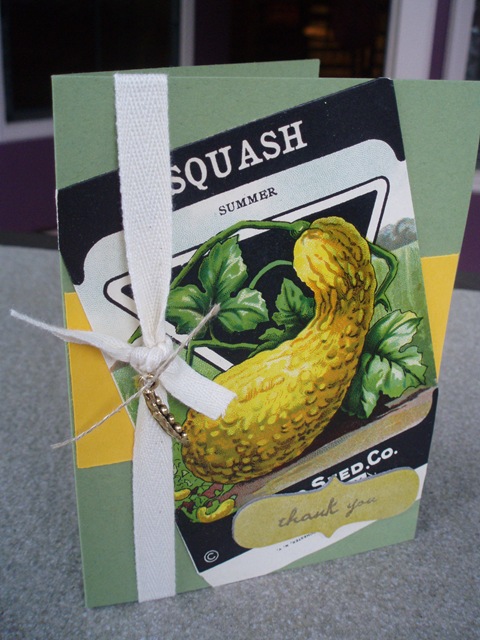
The top card uses a vintage veggie can label and the bottom card uses a vintage squash seed package. Paula included some adorable little veggie charms in her kit (her kits are so fabulous!) and I have a little asparagus on the top card and some peas on the bottom card. I used a little chipboard piece on each card and embossed "Thank You" on top.
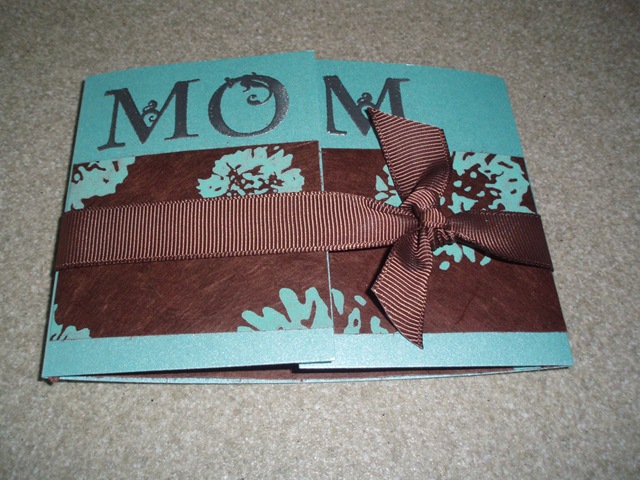
I also made a simple Mother’s Day card for my mom (I know she doesn’t read my blog, so I’m safe with this one):
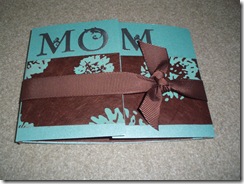
I used the Easter kit from Paula’s Kit Club for this one. I took a gatefold card and added some handmade paper inside and out and tied it shut with a ribbon. I also embossed "MOM" using Stampin’ Up!’s "Lovely Letters" stamp set and silver embossing powder.
I actually considered canceling Paula’s Kits for a while when money was really tight…but it was the one little luxury that I just had to keep. I still look forward to her package every month and hope she keeps them coming for a long, long time!
Posted by Kathy Torrence on May 6, 2008 in
Crafts,
Other items,
Today's Photo Emily had a wonderful birthday party this weekend at Build-A-Bear! I would highly recommend their children’s parties both for the ease of having someone else run the party and the cost as well.
I also thought I’d post a project I did the weekend before Emily and I went to Florida. I did a Stampin’ Up! workshop a few weekends ago – the first one I’ve done in a LONG time!
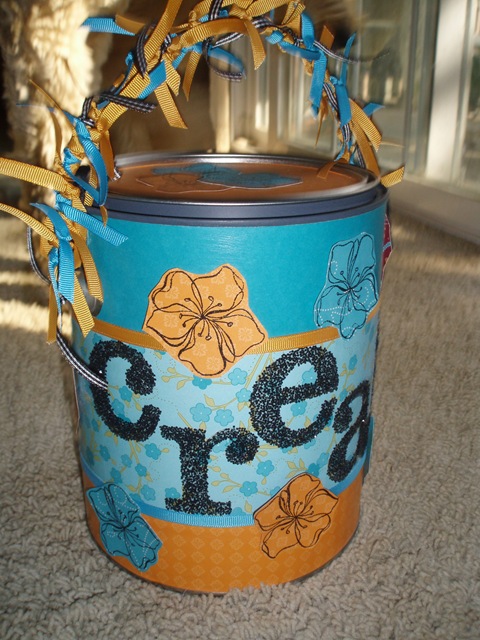
I made a project for the hostess and thought I’d share it with you:
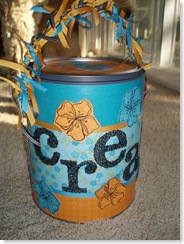
I used the new Bali Breeze double sided paper as well as the Sticky Cuts letters and chunky glitter – I love these colors (the can says "Create" – a great way to be inspired while storing your craft supplies!).
Paint cans like this are a snap to make – here’s a simple pattern to use:
Supplies:
First, start with a new, clean gallon paint can. You can purchase these for under $3 at your local paint store.
Cut three strips of 12X12 patterned paper –
-
One at 1 1/4 inches wide (the bottom strip)
-
One at 4 inches wide (the center strip)
-
One at 2 1/2 inches wide (the top strip)
The strips on this pattern will overlap slightly on the ends – unless you’re incredibly anal about it, just let them overlap – I promise you, no one will notice. 🙂
Apply a thin coat of ModPodge to the back of the bottom strip of paper. Line up the strip with the bottom lip of the can and adhere, allowing the strip to overlap itself on the edges.
Do the same for the center strip of paper, aligning it against the bottom of the handles of the can.
For the top strip of paper, punch two holes with the 1 inch circle punch (a 1 1/4 inch punch will work as well) – punch one hole about 1/4 way into each strip such that the bottom of the hole remains open – this will allow the strip to slide over the handles. Since the strips will overlap, so you don’t have to go crazy lining up the holes – pretty much anywhere on the strip will work as long as you do them both the same way.
Apply ModPodge the same way to the top strip and adhere it against the top lip of the can.
For the lid to the can, measure a circle about the same size as the inside (again – you don’t have to go crazy – a little smaller is fine) and use your circle cutter to cut a circle from the remaining paper. Apply ModPodge and glue to lid.
At this point, you can apply a thin coat of ModPodge over all the top of all the paper on the can. This will make it very durable and give it a nice, even sheen.
After the ModPodge dries, take a thin line of Fabri-Tac and go around the seams between the strips of paper. Apply a piece of ribbon all the way around the seams for a nice, finished edge.
Take small pieces (about 3-4 inches long) of ribbon and tie them randomly around the handle of the can – this is the part that really gives the paint can the "WOW" factor. Don’t skimp – the more ribbon, the more WOW!
Finally, you can take the can and apply whatever embellishments you like – for this can, I took the Sticky Cuts letters and added some black chunky glitter. I also do cans for children’s birthdays and spell out their names with stickers, stamped letters, chipboard…whatever I can find.
Because there is such a huge variety of patterned paper available, you can make a can for any occasion – here are a few ideas to get you going:
Birthday – how about a party in a can? Include candles, party hats, streamers, noise-makers…
Wedding ‘Survival Kit’ – Include clear nail polish, a tampon, hair pins, a Tide-To-Go pen, mints…
Get Well Soon – Include tea bags, a tea cup, tissues, soup, some puzzles and pencils…
Baby – Include a onsie, baby blanket, pacifier, energy bars for mom…
Mother’s Day – Include flower seeds, gardening gloves, a garden journal, garden shears…
I used to do these at craft shows and had great responses.
Let me know if you try this project…have fun!
I finally have a moment to post about our wonderful weekend in Florida – we had an absolutely AWESOME time!
Thanks so much to my friend Linda for hosting us at her home and treating us to a fabulous girl’s birthday weekend!
We went to the beach on Saturday and had a lovely sunny day – it was so nice to feel the warmth again – I could feel my body soaking up the vitamin D!
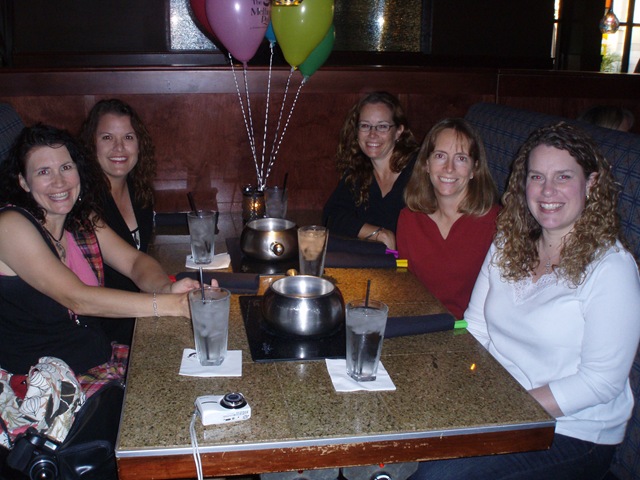
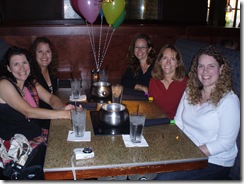
The grown-ups also went out to a yummy dinner at a fondue restaurant called The Melting Pot (thanks to Linda and her friends for making me laugh all night – and thanks to Tom for watching the children):
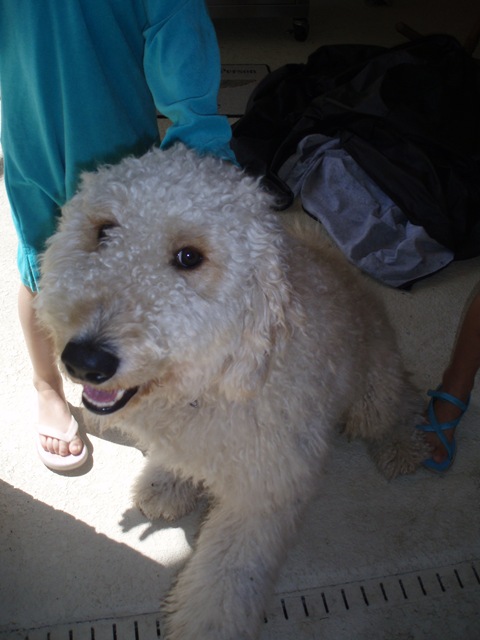
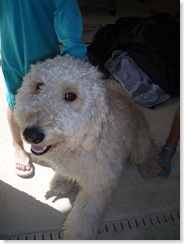
We also got to meet our goldendoodle Geddy’s brother, Buddy. Linda had Buddy shipped to her in Florida when she found out that no one had adopted him…
They also have another dog – a Westie named Max who is 18 years old. Max (who has to wear diapers now, unfortunately) took it upon himself to take up residence in my suitcase…
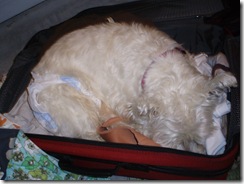
Hmmm….I love dogs and all, but I wasn’t crazy about this…
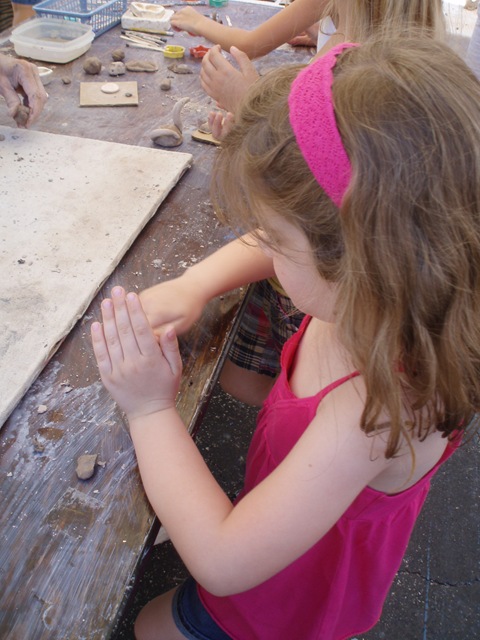
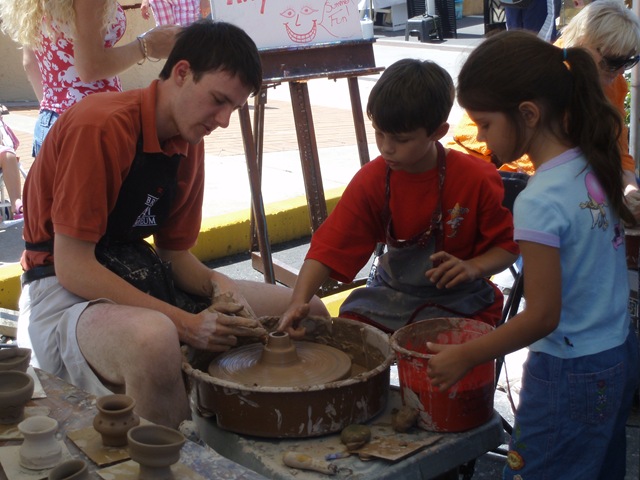
We also visited a local arts festival where the kids got to create some pottery pieces…

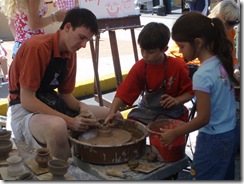
That’s Linda’s son Zachary with Kylee learning to throw clay on the wheel.
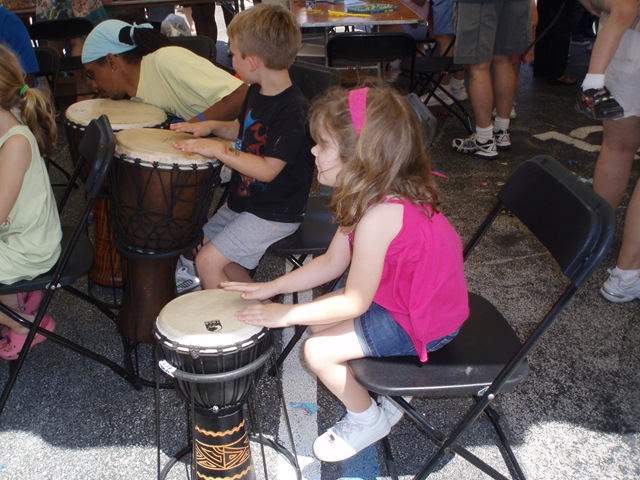
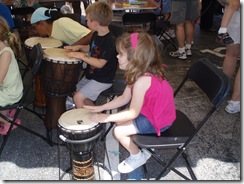
Emily also leaned how to play the bongo drums…and she was surprisingly good at it!
On Sunday, we visited Linda’s church – Georgianna UMC on Merritt Island. I was so moved during the worship service – the Holy Spirit was obviously alive and active in that gathering. I hope that we can capture that energy in our own church soon.
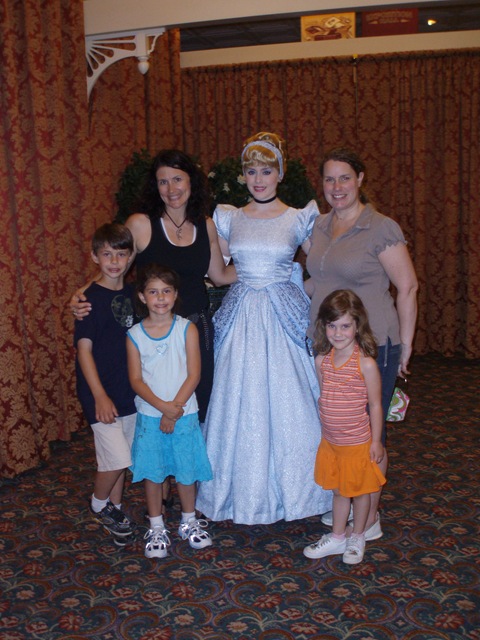
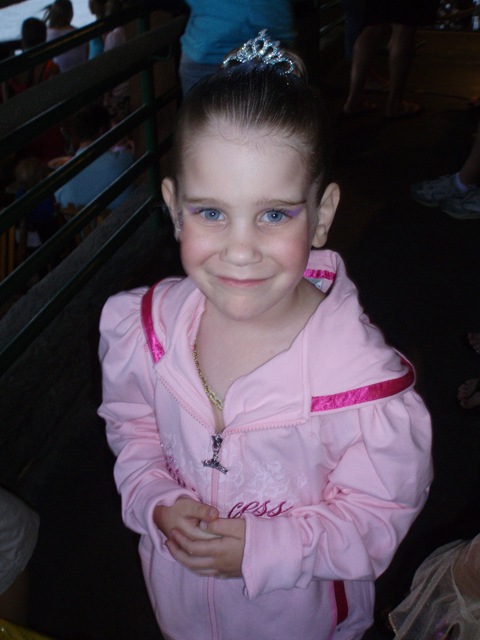
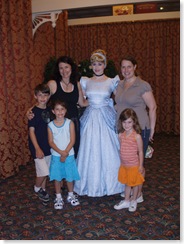
On Monday, we visited the Magic Kingdom (certainly a different kind of kingdom 🙂 in Walt Disney World. The day was fantastic – our timing was great, the weather was super, the kids held up well…we even got to meet Cinderella in the VIP room:
I almost didn’t think I was going to have anything interesting to blog about! Until the “Princess Tragedy”…
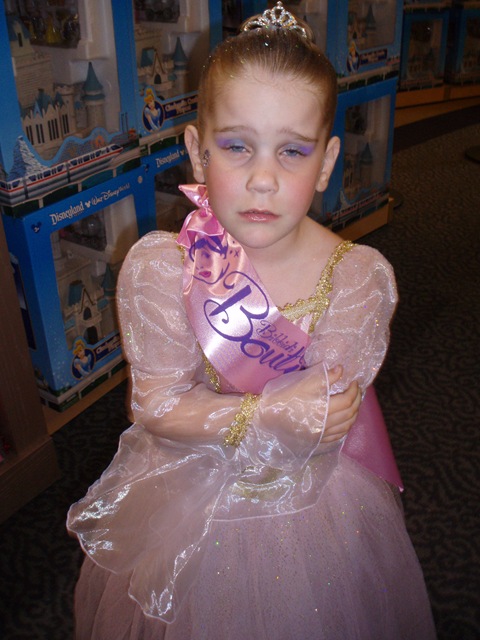
It all started out well enough – after our day at the park, we scheduled princess makeovers for our darling girls at the Bibbidi Bobbidi Boutique in Downtown Disney. The girls were treated to their own personal “fairy godmothers” styling their hair, makeup and nails – and to save a little money, we decided to pull a BYOD – Bring Your Own Dress. Emily had a gorgeous sparkly pink dress that Linda had given her for her birthday – here she is after her makeover…
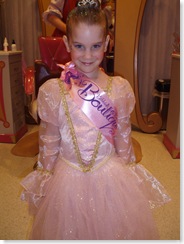
Doesn’t she look happy? Unfortunately, after we left the boutique to go to dinner, Emily decided that her dress was itchy and uncomfortable…things went downhill fast…
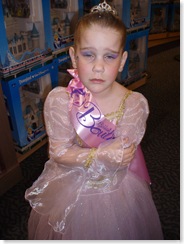
In a moment of motherly-panic, I felt I had no other choice but to purchase another dress – we just spent a large amount of money to have Emily’s hair and makeup done and it was running down her face! The whole makeover experience was in jeopardy!
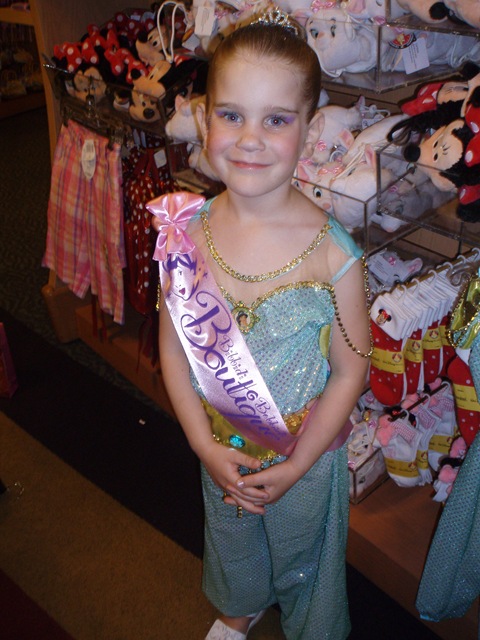
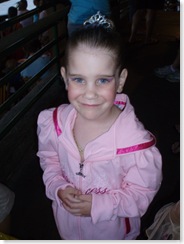
So I frantically searched through the Disney Store and could find no costumes in her size except for Jasmine’s…
I’m really trying to focus on living in the “now” – I am reading the book, The Power of Now by Eckhart Tolle, in an effort to help me still my mind and deal with those things that come my way without stressing. I tried to pause and take a deep breath – I tried to remind myself that there are no “problems” – only “situations”, as the book recommends.
I was doing well until I took the costume, rushed back to the bathroom to change Emily…and the pants were so big, they fell down her tiny hips. There were no other costumes to be found – not even Jasmine in a smaller size! No problems…just situations…
I rushed back to the counter and with that mother-desperation in my voice, asked for some safety pins. Of course, they had none (but the woman at the counter had witnessed the princess meltdown and was very sympathetic). Finally, I went back to the boutique and found some clear rubber bands that I used to gather the material on the pants…we had a happy princess again!

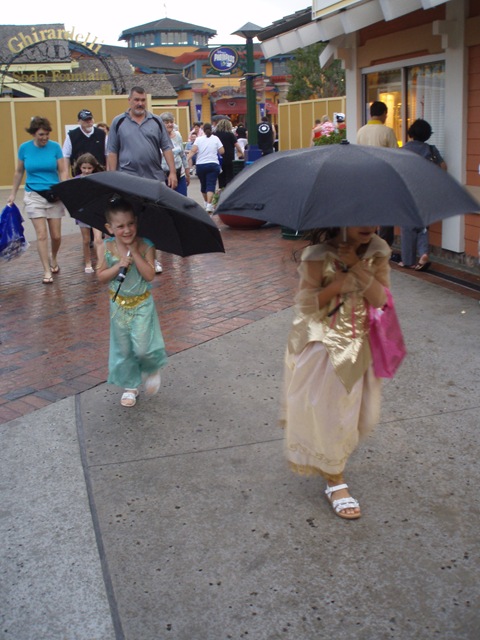
Then it started to rain…no problems, just situations…
Of course, we were forced to purchase a very expensive Walt Disney World “souvenir” umbrella…but we had to keep the newly coiffed and outfitted princesses dry…

Which, of course, let to a couple of very cold princesses. No problems…just situations…
At which point I pulled out my final “mommy-trick” – a sweatshirt that I just happened to purchase a few hours earlier…all was well!
And I got through it without having my own meltdown…I’ll keep working on it…
Emily loved her new outfit so much, she wore it home on the plane (and loved all the attention it brought her). And the fairy godmothers used so much gel and hairspray, the hair stayed in for three days! At least I feel like we got our money’s worth and that all the effort to avert the Princess Tragedy was not in vain…
Thanks again to the Brandons for a wonderful weekend!!!!!
Posted by Kathy Torrence on May 3, 2008 in
Family Stuff Six years ago, I was lucky enough to give birth to the sweetest, most beautiful little girl I could ever imagine. I can still remember as if it were yesterday when they placed her on my stomach for the first time right after she was born – I looked into those tiny little blue eyes and fell in completely and totally in love!
I thank God everyday for my precious gift – Happy Birthday, sweet Emily Rose!!!!