I had a great time at the Creating Keepsakes Convention in Valley Forge, PA this weekend! My friends and I went at the same time last year and had so much fun shopping, we decided to do it again this year but stay overnight for the crop and some more classes this time too.
I took two great classes (I’ll finish up the projects and post them later, but here’s what one of them will look like when it’s done…but with photos of my own family, of course)

and got to SHOP all afternoon! And when I say shop…the vendor area in these conventions is incredible! Lot of new paper crafting products, demos, make-and-takes…and I also did a little bit of celebrity ‘stalking’…
When I first started making soldering projects, I mentioned on my blog a website called Simply Swank that sold pink soldering irons and other supplies including a fabulous instructional DVD.
I may have also mentioned a book, Simple Soldered Jewelry & Accessories by Lisa Bluhm (one of the ‘swanky’ sisters), that I just loved for project ideas and instructions.
Well, Lisa Bluhm, her royal ‘swankiness’ herself was at the convention and I just had to stop and gush over how much I loved her book and products! I was such a geek – but I honestly do love her stuff and didn’t hesitate to tell anyone who stopped by her booth (in fact, she asked if I could stick around for a little while and help sell some sets with my free advertising/testimonial). I eventually pried myself from her booth and continued shopping, promising to send her some emails of some of my projects.
After shopping all afternoon (I got some GREAT bargains!), my friends and I grabbed a quick dinner then went to the crop Friday night. I couldn’t believe how many women were there!

Here we are at our table:

There were lots of vendors inside the crop as well – and one of the people helping out was…Lisa Bluhm! This time, I was even geekier and showed her a photo of one of my projects that I still had on my camera:

I whipped this project up this week after one of my co-workers announced her retirement – THE NEXT DAY! (Note: If you are going to retire, please give your friends more than 24 hours notice in order to plan an appropriate gift) I used a vintage postcard with some images of a rose garden, added some glitter and a rub-on that says, “Enjoy” – then I wrote on the back, “Take some time to stop and smell the roses.” Hey – it was the best I could do in one evening with no advance warning!
Anyway, I showed Lisa this photo on my camera (at least, a tiny version of it on the little camera screen) and she said she loved it (I’m sure she was just humoring me, but I pretended that she meant it anyway). Then I took even one more step toward being arrested for celebrity stalking, I asked to have my photo taken with her and she kindly obliged:

How did she manage to look so good after all those hours at the vendor fair?
I noticed a man standing to the side laughing at us – Lisa said that he was jealous that no one ever recognized him and asked for his photo. Turns out, his name is Brian and he’s a model who has done lots of work including underwear ads for Target…so I told him I’d like his photo too:

Um…I didn’t ask him to see his work – or his abs. That might have been going just a bit too far. Right, Mike?
I also chatted with former Paper Crafts editor-in-chief Stacy Croninger (I had my photo taken with her last year, so I didn’t make the poor woman pose again) – but this time, she came up to OUR table (was she stalking me???). Turns out that she just announced that she is leaving the magazine to take a position as the director of the Creating Keepsakes conventions. We talked about that a little bit (I offered some feedback on the convention – she also humored me and made it seem like she was interested in my opinion) and I showed her the photos of Emily during the “princess incident” that I happened to have out on the table – she thought they were really cute and would make a great layout…I’ll work on that when I have time.
I also saw Mindy from Crop Classix – she also found me out in the crowd and came over to chat…I guess scrapbooking is really becoming a small community – you see the same people year after year at each event.
I didn’t get nearly as much done at the crop as I’d hoped (I was too busy chatting!), but I had a lot of fun and will definitely go back next year!
After a late night of cropping, we headed back to the vendor fair the next morning and picked up a few more bargains and did a few make-and-takes. Most of the free make-and-takes were pretty lame, (mine were always MUCH better, if I do say so myself)…but what do you expect for free?
On my way out, I ran into Stacy Croninger again and she was with Stacy Julian, the founding editor of Simple Scrapbooks. But poor Stacy J already had a list of other stalkers waiting for photos, so I just said hello and headed out.
I had JUST enough gas in the truck to get home…and then got stuck in a MAJOR traffic backup on the Schuylkill Expressway (known for its traffic backups) – it took me almost 1 1/2 hours to get home – twice as long as it would under normal conditions. But I didn’t run out of gas (thank goodness) and to ease my stress, I took the time in the truck to admire my purchases…now let’s see what I can create with them!
Posted by Kathy Torrence on Jul 11, 2008 in
Crafts,
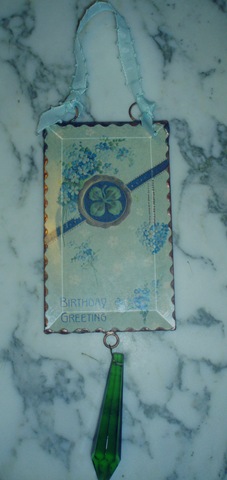
Soldered Art I made another birthday gift using a vintage postcard the other day for Andrew’s step-mom Clare:
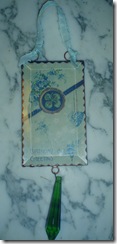
I liked the colors in this card – the cool blues and greens…I also added a green crystal drop on the bottom for even a little more color.
I used the silver scallop-edge tape with some copper patina – there’s a little bit of copper in the postcard image and I wanted to pick that up.
I wish I would have added some glitter to the image before I put it under the beveled glass…oh well. It’s pretty anyway, don’t you think?
Posted by Kathy Torrence on Jun 16, 2008 in
Crafts,
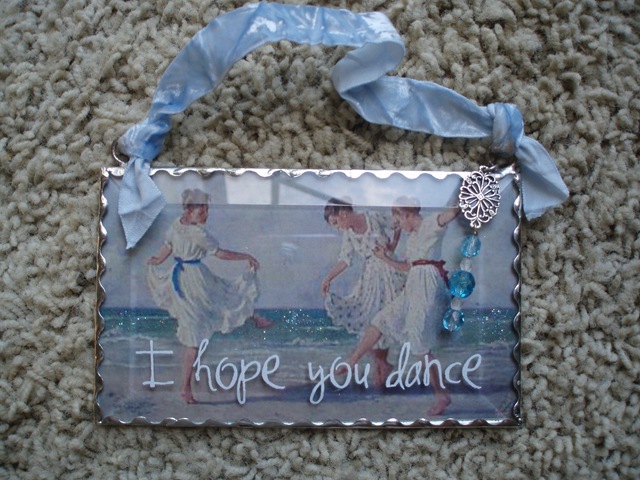
Soldered Art I just realized that tomorrow is Emily’s last dance class and I had no gift for her dance teacher!
So I took the chance to use a little creativity…
I used a vintage postcard image of some young girls dancing on the beach and made this:

I added some Dazzling Diamonds to the water and put it behind beveled glass, taping the edges with some scallped-edge tape and soldering over the tape.
I also added some rub-ons right on the glass for the sentiment. This took longer than I thought – the first ones I used looked awful because they had a clear border around them – I had to remove them with clear tape. These were not my first font choice, but the Making Memories rub-ons look SO much better on glass (there’s no border – just clean letters).
I added a velvet ribbon, a piece of filigree and some beads. This could be a sweet Christmas ornament or just something to hang on a hook.
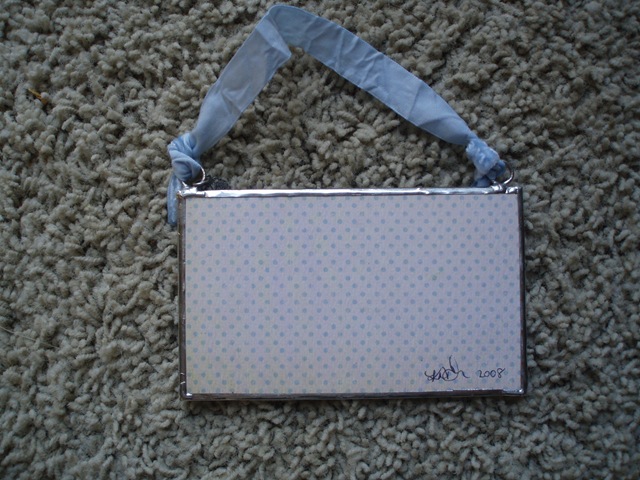
I only used one piece of glass – the back is patterned paper:
This makes the ornament much lighter (but is a little harder to tape).
Not bad for last-minute – I hope she likes it!
Posted by Kathy Torrence on May 28, 2008 in
Crafts,
Soldered Art While we were in Cape May, I came across some pretty glass ornaments in a gift shop. They were made with beveled glass with soldered edges and each had a little collage inside – and they were selling for $45 and up! I was inspired to be creative…
I realized that it had been a long time since I played with my soldering iron and when I heard that two of my co-workers had birthdays this week, I realized that I had the perfect excuse to get started!
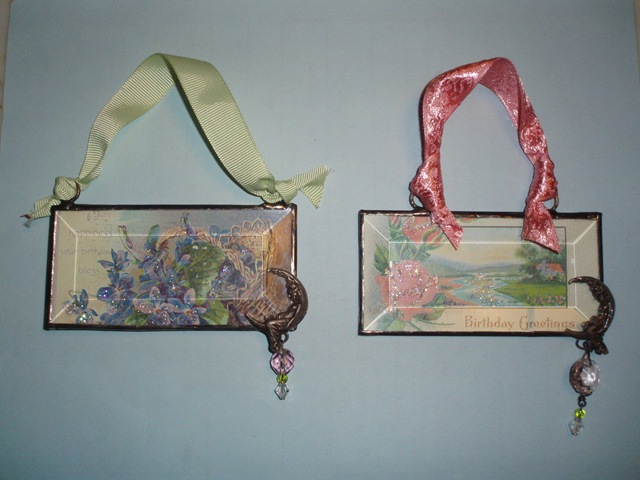
I made up these little “Birthday Cards Under Glass” for them:
I took some vintage birthday postcards and scanned them and printed them onto white cardstock with my fancy new scanner and color laser printer that I received for my birthday. I added some glitter and put them behind a piece of beveled glass.
I tried something new with these – instead of sandwiching each collage between two pieces of glass, I taped the front piece of glass directly to a piece of patterned paper on the back (inspired by the pieces I saw in Cape May). This makes them much lighter – especially for larger pieces like these.
I added some jump rings and some lady-in-the-moon charms and beads, tied a pretty ribbon…and now I have some pretty little gifts!
Happy birthday Sybil and Shanee!
Posted by Kathy Torrence on Mar 10, 2008 in
Crafts,
Jewelry,
Soldered Art,
Today's Photo So, as I posted last time, I really did want to escape to the Poconos every weekend until we had to give up our winter seasonal spot, but…
Last weekend I had the stomach flu. It was inevitable – everyone else in the house had it. So…we didn’t go away that weekend.
Then this weekend we had some of the wildest weather on record – it was warm with heavy rain on Friday and Saturday followed by some incredible winds (we lost cable and internet for a while and lost all power for a little bit) and cold temperatures yesterday. There were lots of branches down and several trees lost in our neighborhood.
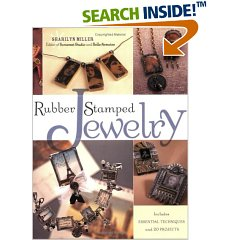
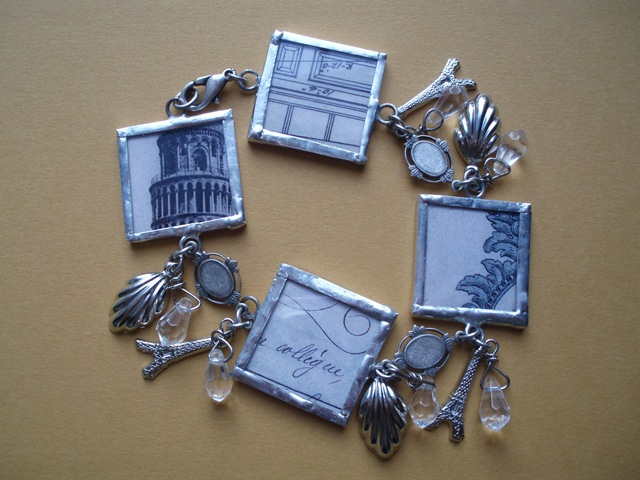
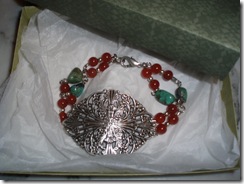
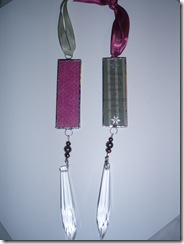
The good news is that I finally had a chance to play in my craft room during the storm. I have been inspired by a bracelet on the cover of this book for some time:
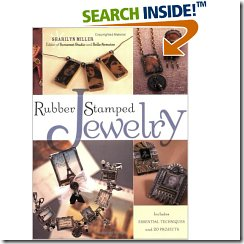
I just love the Eiffel Tower pieces in the lower left corner! I used it as inspiration and came up with this piece:
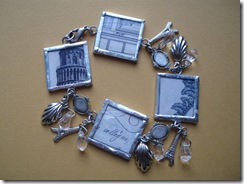
The images are from some ArtChix collage sheets I had – the images were originally larger, but I just cut the pieces I thought would look best. The bracelet links with the images are 1X1 inch squares of glass that are taped and soldered around the edges – there are images on both sides of the glass. I added some clear glass drops, filigree connectors and some Eiffel Tower and scallop charms.
Speaking of glass – I had some 1X1 inch beveled squares in my stash, but wanted this piece to be lighter and flatter so I decided to try cutting microscope slides (1X3 inches) down to the correct size. This was my first attempt at cutting small pieces of glass and I was not as successful as I’d hoped. I went through many broken and cracked slides before I came up with enough pieces for the bracelet. Happily, I have no major injuries to report other than a small nick on my finger and a strange sensation of something scratching me along the bottom leg of my sweatpants (some small, embedded shards of glass, perhaps?). But I like how the bracelet turned out, so I guess it was worth it.
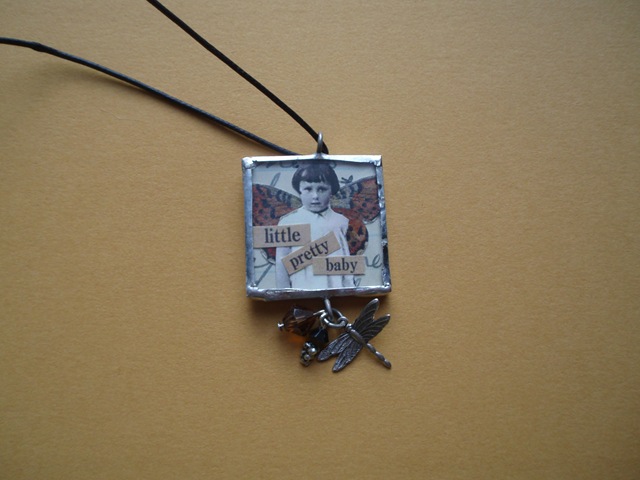
I also decided to make a small necklace – I used one of the successful 1X1 inch cut pieces to make a tiny collage:
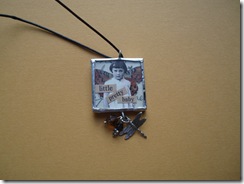
I used a piece of old ledger paper found in my stash of ephemera as the background then added a pair of butterfly wings behind a vintage image of a little girl. I strung the piece on a very thin leather cord and added a dragonfly charm and some crystals hanging from the bottom. I think this will be cute worn with a pair of jeans and a black top (my standard casual wardrobe).
And while I was in my craft room, I decided to try and enter the Stampin’ Up! Artisan Contest again this year. While I didn’t win last year, several of my pieces were on display at the Stampin’ Up! convention in Denver. We have to make two 3D projects as well as several cards and scrapbook pages for the contest. So far, I’ve at least done the 3D projects – can’t show them here, but I think they’re pretty good… 🙂
Oh – and I had another card published in Take Ten Stamper’s Sampler in the spring issue. I got my artist’s comp copy in the mail and had to search through to find my card. It’s been so long since I even sent anything in – the card was from LAST Christmas…I need to gather up some more projects and send them in soon.
It’s been really difficult lately to find the time to work on crafts – this job-thing has really cut into my creative time. It’s hard to find the time to do all the things I WANT to do as well as all the things I NEED to do.
I did manage to book a trip to Florida to visit my friend Linda next month. We going to visit between my birthday and Emily’s birthday and have a nice girls’ weekend. I’m looking forward to that!
And I’m sorry that I haven’t been able to post here as often as I used to – bear with me as I adjust to the working world…I’m getting there…
Posted by Kathy Torrence on Dec 31, 2007 in
Crafts,
Jewelry,
Other items,
Soldered Art I FINALLY had a chance to finish gifts for my friend Linda (who lives in Florida) the other day. Okay – I know – they’re late. But that’s the great thing about old friends – they love you anyway!
So…Linda, if you’re reading this and you haven’t received your package yet – DON’T READ ANY FURTHER or you’ll spoil your surprise!!!!
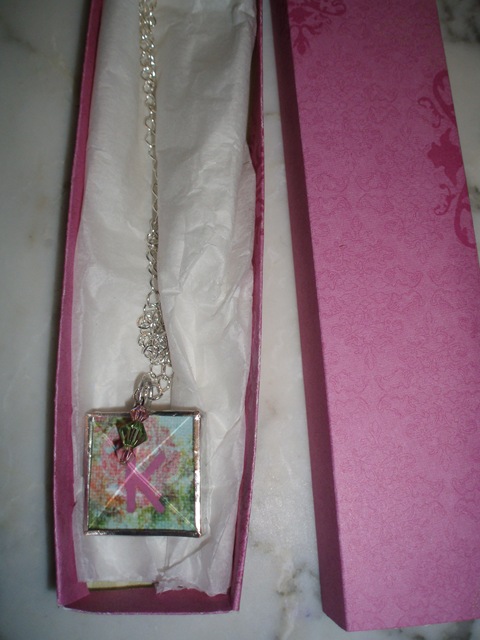
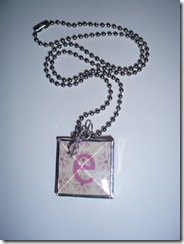
For Linda’s daughter Kylee, I created one of those "little girl" initial necklaces I posted previously:
I used a small piece of patterned paper, an letter ‘k’ rub-on and sandwiched it between two 1X1 pieces of beveled glass. I forgot to take a picture of the back, but I thought it turned out pretty cool – I took a small piece of a doily and adhered it over the back side of the double sided paper for a lace effect.
Oh – by the way – I also made all these gift boxes. These are the ‘nugget’ boxes that are so popular on SplitCoastStampers this season. They are made to fit Hershey’s Nuggets, but they also fit small items like jewelry.
For Linda, I made a bracelet from green turquoise and red carnelian beads as well as some silver filigree pieces:
I just love these colors together!
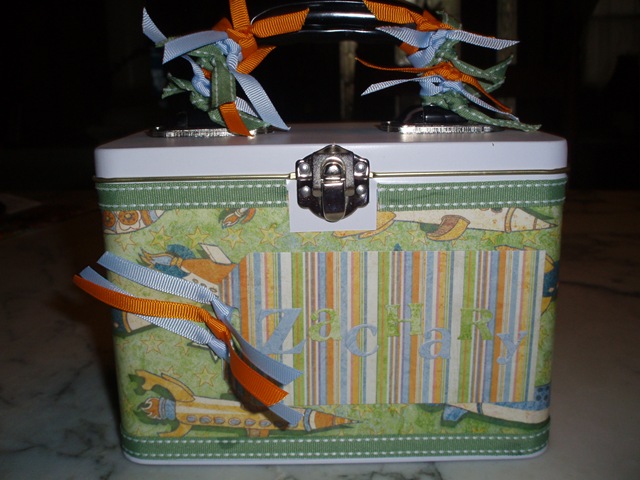
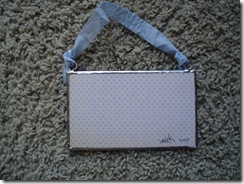
For Linda’s son Zachary, I made a little lunch tin that he can use for lunches or to store crayons and other art supplies:
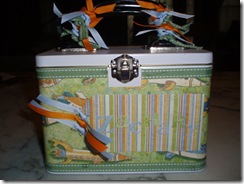
I used some Basic Gray paper with a little ModPodge to adhere it to the tin. I also used some Stampin’ Up! double stitched and grosgrain ribbon as well.
For her husband Tom, I sent some cigars from Mike’s collection – no photos there! But I did package them in a paper towel tube then wrapped it like a ‘cracker’ – hmm…maybe I should have taken some photos of that.
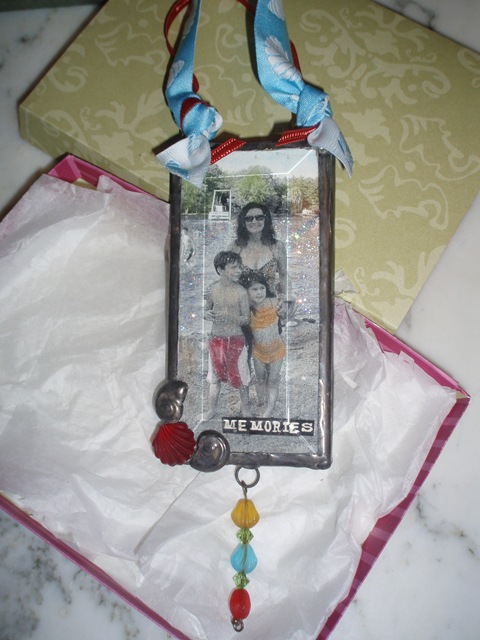
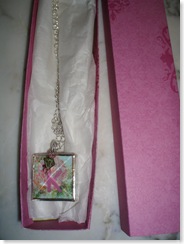
Finally, I sent a gift for the whole family. I made a Christmas ornament using a photo taken while Linda was here visiting this summer:
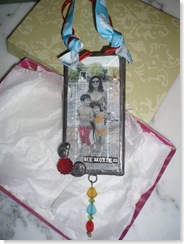
I printed the photo in black and white on cardstock and then colored in the images with chalks in colors to match my color scheme of orange, red, turquoise and green. I added some glitter to the water in the photo and added the word "memories". I love the way this turned out – it really looks like a vintage photo.
Then I sandwiched the photo between some pieces of beveled glass (the back side is a really pretty orange handmade paper with tiny white polka dots) and taped and soldered the edges. On the bottom corner, I added some metal seashells (brads from which I cut the back) and a glass scallop shell. Then I hung some more glass shells and crystal beads from a jump ring on the bottom and used a seashell ribbon as the hanger at the top.
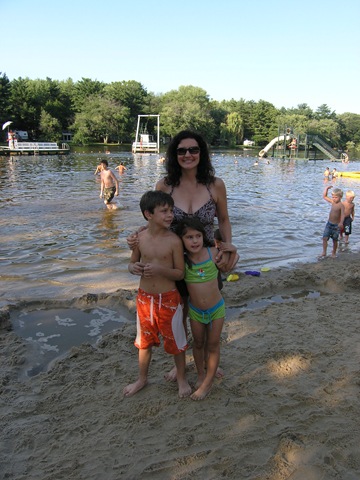
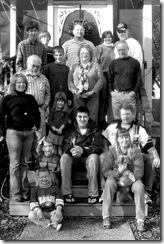
Just as a comparison, here is the original photo I used:

In fact, I liked this idea so much, I made more ornaments for Mike’s family using the same technique and this family photo:
Unfortunately, I forgot to take photos of the ornaments before I gave them out… 🙁
But I used the same technique, using red and green for everyone’s clothing and adding a Christmas sentiment at the bottom.
I love that I can modify the black and white photos to match any color scheme – no matter what the people were actually wearing!
Posted by Kathy Torrence on Dec 16, 2007 in
Crafts,
Jewelry,
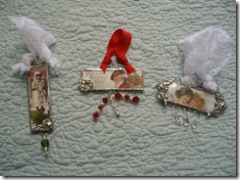
Soldered Art Yesterday, Emily went to a birthday party for several children and I had a chance to play with some more jewelry designs – this time for six-year-old girls.
I wish I had taken photos of the gifts I made (I think they turned out really cute), but since I wasn’t feeling well, I didn’t have a chance.
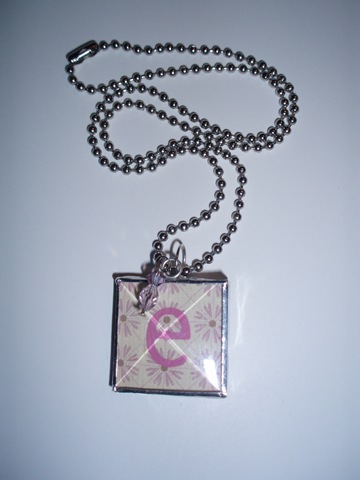
But…I did make a similar necklace for Emily as a ‘test run’ – and I did manage to take a photo of it:
To make these, I started with a small piece of patterned paper. I tried to use whatever colors Emily told me were their favorites. I then added a rub-on initial for each girl for the front of the charm – "e" for Emily… ;)
I also stamped a birthday sentiment on the back for the birthday girls (Emily’s just has a flower). Then I sandwiched the paper between two small pieces of beveled glass (1X1) then taped and soldered the edges. I added a jump ring to the top and used a ball chain to hang the pendant. I also added a little dangle with some matching crystals…and voila! A sweet little necklace perfect for a six-year-old!
Posted by Kathy Torrence on Dec 16, 2007 in
Crafts,
Soldered Art Okay, so I was on a roll making little ornaments for gifts this year…then Mike asked me to make some for his office. He needed about 25 in all – yikes! So I decided to keep them VERY simple:
I took a piece of Stampin’ Up!’s Holiday Harmony paper and stamped a sentiment from the Star-Studded Season stamp set using Purely Pomegranate ink. I also stamped a little star above and below the sentiment and embossed it with silver embossing powder (as seen on the right above). The other side of the paper I left plain (as seen on the left – that’s the back of the ornament).
I sandwiched the paper between microscope slides, taped and soldered the edges and added two jump rings – one to the top and the other to the bottom. I tied a hanging ribbon to the top and strung some fresh water pearls (pomegranate and green) and a crystal from the bottom.
It’s like a Christmas card you can hang on your tree!
Posted by Kathy Torrence on Dec 16, 2007 in
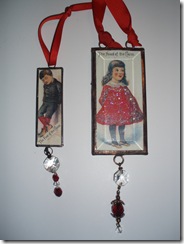
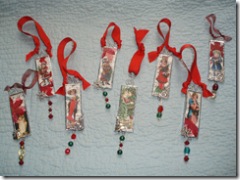
Crafts,
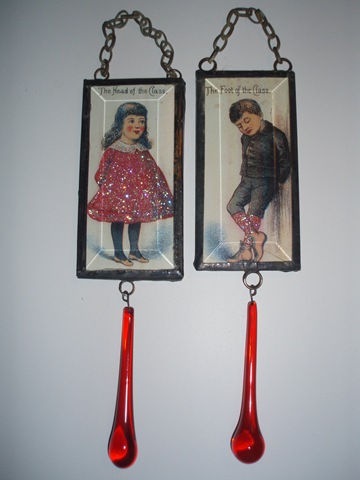
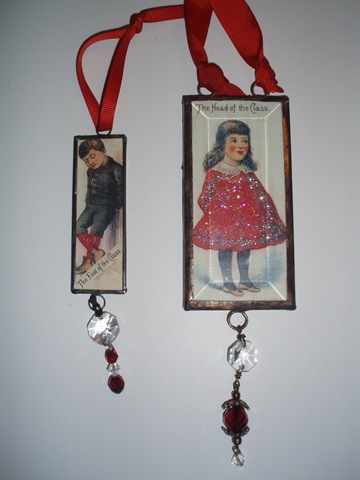
Soldered Art Remember a while ago that I posted about finding great little vintage advertising cards with the children on them? I found a use for them – I’m using them to make teacher’s gifts!
One card says, "Head of the class" and has a cute little girl in a red dress – the other says "Foot of the class" and has a sad little boy image. I color copied the cards at my local copy store, put them back-to-back and used them to make Christmas ornaments (on each ornament, one side has the girl and the other side has the boy):

I added some glitter to the red parts of the images and sandwiched them between two pieces of beveled glass then taped and soldered the edges. I added a few jump rings to hold a hanging chain and some red crystal drops. I also added some "black magic" finish to the solder to get an antiqued look.
I made several more – on one, I tried using a copper patina finish instead of the black magic, used beads instead of the crystal drop, and used a ribbon hanger. On the other one, I reduced the image to fit it between two microscope slides instead of the beveled glass (I had to cut off the words and add them over the image):
I love how these turned out – I hope the teachers like them too!
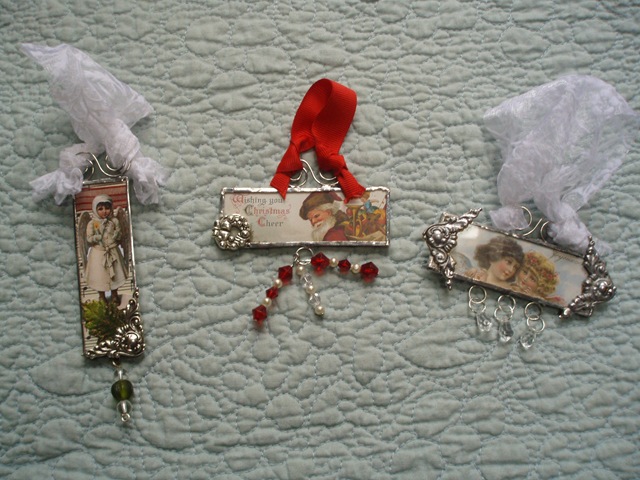
Posted by Kathy Torrence on Nov 19, 2007 in
Crafts,
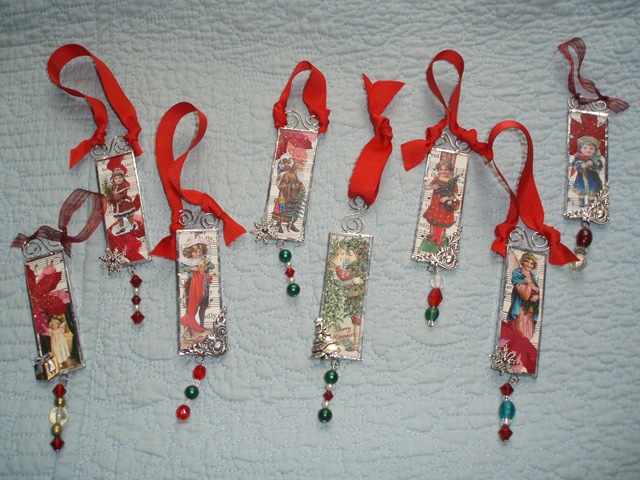
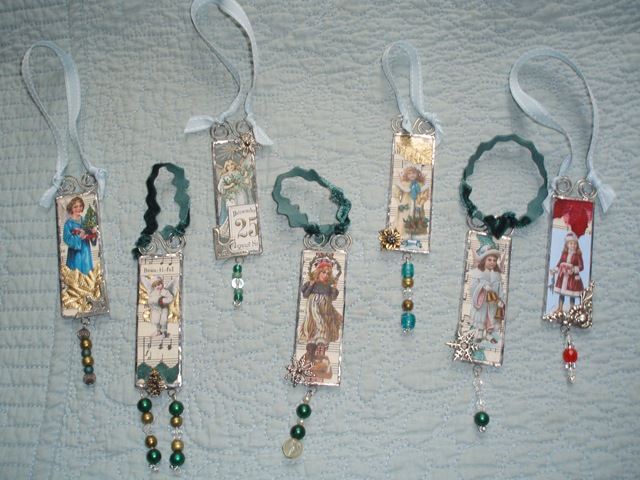
Soldered Art Some of my friends suggested that we hold a Christmas ornament exchange this year. It’ll work kind of like a traditional ‘cookie exchange’ but instead of extra calories, we’ll each go home with some beautiful new ornaments!
I’ve encouraged all participants to work with whatever medium they love – paper, wood, ceramics, beads, yarn, glass…there are so many possibilities! We will all make twelve ornaments to exchange – if there are more than twelve people, we’ll draw numbers to determine who gets which ornaments.
Now that I’m back in business with my new soldering iron, I had a chance to work on my own ornaments for the exchange:
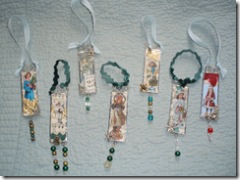
Okay – there are more than twelve, but was on a roll and I thought I’d make some extras to give as gifts while I was at it!
To make the ornaments, I stared with two microscope slides. For the front piece of the ornament, I used vintage Christmas music (given away by our church during the move) as the background. I carefully cut out vintage Christmas images from some clip art sheets to make a tiny collage.
Each ornament is different – for some, I added ribbon, flowers, leaves and other embellishments; for others, the image was large and ornate enough to stand on its own. The back of each ornament is a piece of red poinsettia flocked paper that I signed and dated.
I sandwiched the collage and paper between the glass and taped and soldered the edges. I soldered a swirly paper clip to the top as the hanger (tied with ribbon) and soldered one or two small silver embellishments to the outside of each ornament. By the way, some of the embellishments were actually gold-toned to start – I either tinned the whole piece (see…I’m getting the soldering language down now!) to make it silver or just added some small silver accents if there was other gold in the collage.
I also added one or more jump rings to the bottom of the ornament and then strung some beads on a beaded head-pin and attached it to the ring. I used a lot of vintage beads on my pieces to keep with the feel of the collages.
I also tried to venture out from the traditional red Christmas color and include some shades of soft blue and teal as well.
I hope the group likes my ornaments – I can’t wait to see what everyone else creates!