Paint Can Project
Emily had a wonderful birthday party this weekend at Build-A-Bear! I would highly recommend their children’s parties both for the ease of having someone else run the party and the cost as well.
I also thought I’d post a project I did the weekend before Emily and I went to Florida. I did a Stampin’ Up! workshop a few weekends ago – the first one I’ve done in a LONG time!
I made a project for the hostess and thought I’d share it with you:
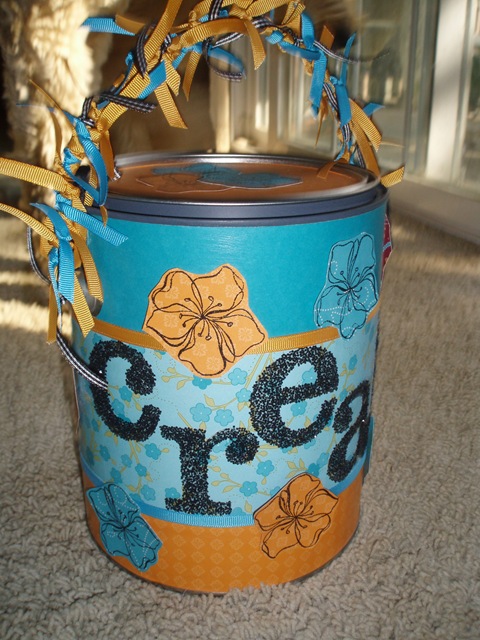
I used the new Bali Breeze double sided paper as well as the Sticky Cuts letters and chunky glitter – I love these colors (the can says "Create" – a great way to be inspired while storing your craft supplies!).
Paint cans like this are a snap to make – here’s a simple pattern to use:
Supplies:
-
3 sheets 12X12 patterned paper
-
Coordinating ribbon
-
ModPodge
-
Fabri-Tac
-
1 inch circle punch
-
Circle Cutter
-
Gallon paint can
First, start with a new, clean gallon paint can. You can purchase these for under $3 at your local paint store.
Cut three strips of 12X12 patterned paper –
-
One at 1 1/4 inches wide (the bottom strip)
-
One at 4 inches wide (the center strip)
-
One at 2 1/2 inches wide (the top strip)
The strips on this pattern will overlap slightly on the ends – unless you’re incredibly anal about it, just let them overlap – I promise you, no one will notice. 🙂
Apply a thin coat of ModPodge to the back of the bottom strip of paper. Line up the strip with the bottom lip of the can and adhere, allowing the strip to overlap itself on the edges.
Do the same for the center strip of paper, aligning it against the bottom of the handles of the can.
For the top strip of paper, punch two holes with the 1 inch circle punch (a 1 1/4 inch punch will work as well) – punch one hole about 1/4 way into each strip such that the bottom of the hole remains open – this will allow the strip to slide over the handles. Since the strips will overlap, so you don’t have to go crazy lining up the holes – pretty much anywhere on the strip will work as long as you do them both the same way.
Apply ModPodge the same way to the top strip and adhere it against the top lip of the can.
For the lid to the can, measure a circle about the same size as the inside (again – you don’t have to go crazy – a little smaller is fine) and use your circle cutter to cut a circle from the remaining paper. Apply ModPodge and glue to lid.
At this point, you can apply a thin coat of ModPodge over all the top of all the paper on the can. This will make it very durable and give it a nice, even sheen.
After the ModPodge dries, take a thin line of Fabri-Tac and go around the seams between the strips of paper. Apply a piece of ribbon all the way around the seams for a nice, finished edge.
Take small pieces (about 3-4 inches long) of ribbon and tie them randomly around the handle of the can – this is the part that really gives the paint can the "WOW" factor. Don’t skimp – the more ribbon, the more WOW!
Finally, you can take the can and apply whatever embellishments you like – for this can, I took the Sticky Cuts letters and added some black chunky glitter. I also do cans for children’s birthdays and spell out their names with stickers, stamped letters, chipboard…whatever I can find.
Because there is such a huge variety of patterned paper available, you can make a can for any occasion – here are a few ideas to get you going:
Birthday – how about a party in a can? Include candles, party hats, streamers, noise-makers…
Wedding ‘Survival Kit’ – Include clear nail polish, a tampon, hair pins, a Tide-To-Go pen, mints…
Get Well Soon – Include tea bags, a tea cup, tissues, soup, some puzzles and pencils…
Baby – Include a onsie, baby blanket, pacifier, energy bars for mom…
Mother’s Day – Include flower seeds, gardening gloves, a garden journal, garden shears…
I used to do these at craft shows and had great responses.
Let me know if you try this project…have fun!