Posted by Kathy Torrence on Oct 25, 2007 in
Cards Today’s SplitCoastStampers challenge was to use the masking technique in some way on a card.
I just received the True Friend stamp set yesterday and wanted to use it for my card. After many attempts at masking the big flower and receiving less-than-pretty results, I decided to do a reverse mask using sticky notes to create a border instead.

To do this technique, take sticky notes and arrange them to create a square on your cardstock. Using a sponge, stipple brush or dauber, color the inside of the box with a light ink. When you remove the notes, you have a nice shadow box effect. After creating a box with River Rock ink, I stamped my flower image on top with So Saffron and Mellow Moss – I was going for a much softer look for today’s card.
If you look closely, you’ll also notice that I embossed the edges of the So Saffron layer with a brass template and stylus. Dry embossing is a simple technique that adds a lot of elegance to a project. I also used the paper piercer on this card, taffeta ribbon, the Word Window punch, a pearl from the Pretties kit…I used lots of supplies today! 🙂
Posted by Kathy Torrence on Oct 24, 2007 in
Cards,
Crafts I really like the card that I made for today’s SplitCoastStampers Sketch Challenge.
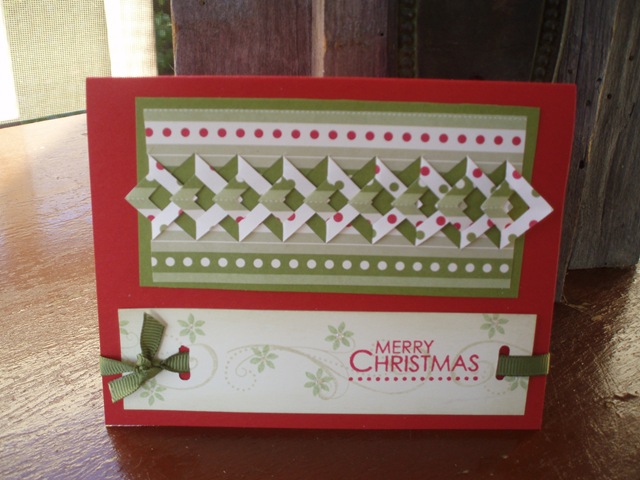
I used Purely Pomegranate, Soft Sky and So Saffon – a color combo I haven’t used before. I also used a new stamp set, Enjoy Every Moment. I received this stamp set free from Stampin’ Up! for holding a $400 workshop within two weeks after the Philadelphia Regionals in September. This is the first time I’ve used the stamp set, and although I don’t think I would have purchased it myself, I feel that I’m going to use this set quite a bit now that I have it (the set will be available in the Stampin’ Up! Spring/Summer Collection that comes out in January).
Here’s my card:
The card’s not nearly as dark as it appears in the photo – it’s a rainy day here in NJ and I had a hard time getting a good photo.
There are lots of layers on this card – I went a little nuts! There are also pop-dots under the “O” (as well as a rhinestone brad) and pop-dots under the scallop punch in the corner. I also LOVE using the new satin ribbon – it’s very elegant and rich!
Posted by Kathy Torrence on Oct 23, 2007 in
Cards,
Crafts A great way to get your creativity flowing is to participate in project challenges. What I love about them is that they give you a starting point – a technique, sketch, color combination or other limitation within which to create a project. Sometimes narrowing down your choices is the first step to a successful project. When you have access to too many colors, embellishments or stamps, it becomes difficult to start (not that one can have too many stamps or embellishments, mind you!).
SplitCoastStampers (my favorite online stamping site) has a new challenge every day. There is no competition – no prizes to win – but that’s the beauty of it. You can make your own projects at your own pace – there’s no pressure. Then you can post your creations if you want to share them – and you can get ideas from other stampers’ posted projects. If you don’t want to share, that’s okay too – the challenges will still give you a chance to try something new.
I was a dedicated challenge participator during the summer when my children didn’t have school and a million other activities going on. But I missed the challenges and this week decided to start participating again – even if the project has to be finished quickly and can’t be as elaborate as I’d like. At least I’ll do some creating every day.
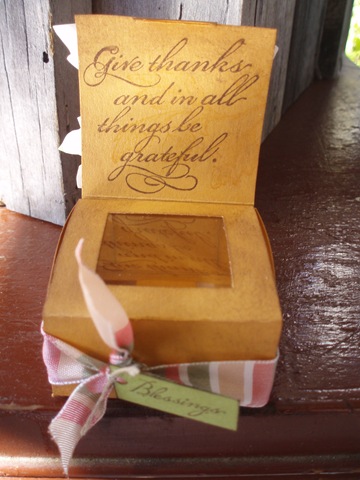
So…Monday’s challenge was to create a simple little treat box using a given template. I wanted to do something for Thanksgiving – I thought maybe I could use this project for my Stamp Club next month (see – in the end, I’m actually saving time because I don’t have to think projects up myself and start from scratch!) My favorite Thanksgiving/fall set is Country Blessings from Stampin’ Up! It was offered last year through a special with Country Living magazine, but it’s no longer available. I’m sure glad I bought it when I did!
Here’s my box:
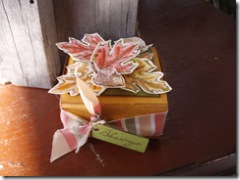
This photo is deceiving – this box is REALLY tiny! It measures just about 2 inches across. The leaves on the top are watercolored then covered with Crystal Effects for a shiny look.
The inside of the box looks like this:
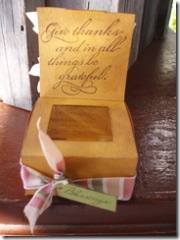
There is a little peek-a-boo acetate window punched out with a 1 1/4 inch square punch (gives you an idea of how small this is!).
I thought this would be cute as a little place setting at Thanksgiving filled with mints, nuts or some other treat.
These are simple to make – the template can be found at the challenge link above.
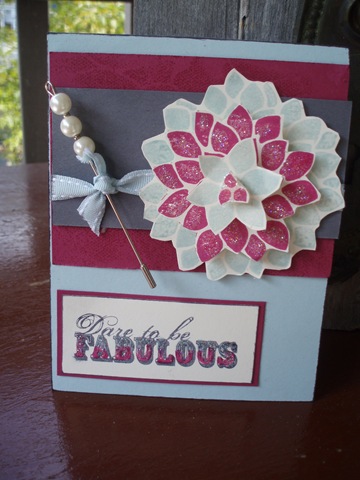
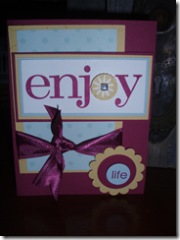
Today’s challenge was a color challenge. We were to create a project using Basic Gray, Purely Pomegranate and Soft Sky – here’s my card:
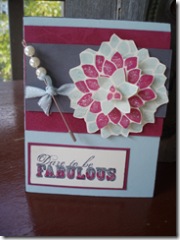
I cut out each layer of the flower stamped from Fabulous Flowers and layered them with dimensionals. I also added some Dazzling Diamonds to the pomegranate layers as well as to the letters for a little bling. And I added a little stick pin with some pearls from Stampin’ Up!’s Pretties Kit – this flower reminds me of a pretty corsage and I was inspired to create a corsage-like card. This card was designed and created in less than 30 minutes.
I’ve been working the last few days on some more ideas using acetate – at last month’s Stamp Club meeting, my friend Denise said that she has boxes and boxes of acetate sheets (pieces of acetate are basically overhead transparencies from an office supply store) and needed some new ideas for them. I came up with what I think is a new technique and I can’t wait to show everyone (I don’t want to spoil it here…I want people to keep coming to my Stamp Club, you know)!
I also just got a great big box of alterables from Oriental Trading Company – lots of holiday stuff. If only I could spend all day in my craft room…but I have homework to grade and midterms to print out…sigh…won’t somebody pay me to just craft all day?!?!
Posted by Kathy Torrence on Oct 22, 2007 in
Cards,
Crafts I was watching the Carol Duvall show this weekend, and I saw a new paper-folding technique that I just had to try!
The technique is called Illusion Braiding and results in a wonderful effect – especially with double-sided paper.
Here is a sample used on a card with Stampin’ Up!’s Dashing paper:
And here’s a sample on a bookmark using Stampin’ Up!’s Wintergreen paper:
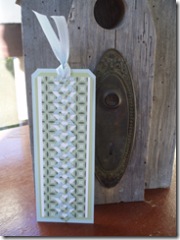
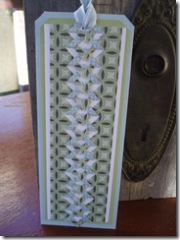
Aren’t they beautiful?
This is not a quick-and-easy technique, but once you’ve developed the template, it’s not difficult to do. You basically take a narrow piece of cardstock and fold it in half, cutting a series of alternating V’s – larger, then smaller. The V’s are then alternately folded to create this wonderful pattern.
Here is a link to the Carol Duvall show episode with a complete tutorial for this technique – you should give it a try!
Posted by Kathy Torrence on Oct 22, 2007 in
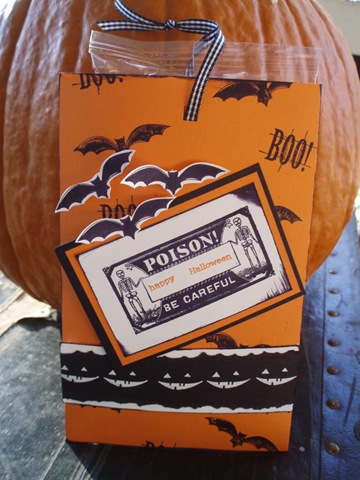
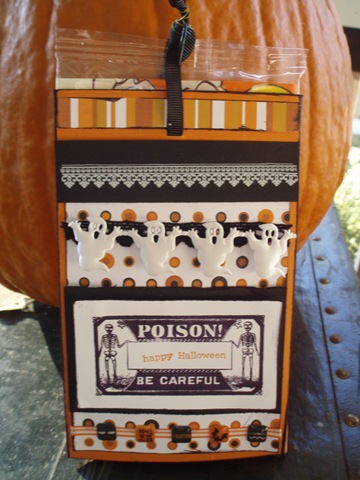
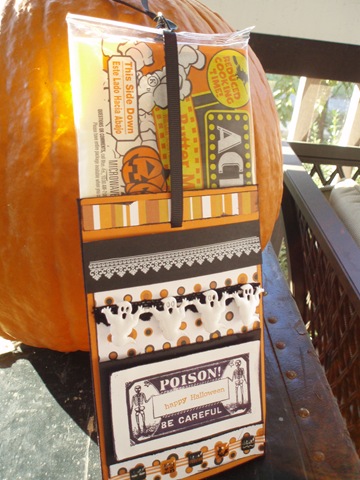
Crafts Here’s a cute idea for Halloween – treat sliders to hold little bags of popcorn or chocolate bars!
These are really easy to make – here are two samples:

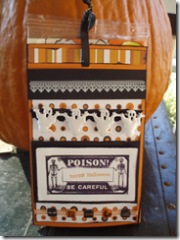
When you pull the ribbon, the popcorn or candy bar slides up:
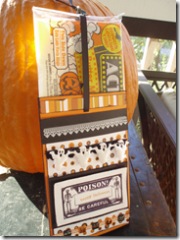
To make the treat slider, start with a stamped piece of 8 1/2 X 11 cardstock.
Place your treat on the cardstock and mark about 1/4 inch around all 4 sides. Cut the cardstock on the top and bottom and score on the side lines.
Fold on the score lines to wrap your treat with the cardstock (trim the ends if necessary) and adhere. Slide the treat out.
Punch two holes at the top of the slider for the ribbon (one on the front and one on the back). Embellish the front however you’d like.
Cut a piece of ribbon a little more than 2X the size of the treat (add about 5-6 extra inches to tie the knot). Fold the ribbon in half and place the treat on the fold.
Push the ribbon and treat into the slider, then take the ribbons from the inside and thread them through the two punched holes to the outside. Tie in a knot at the top with both pieces of ribbon. When you pull the ribbon up, the treat will come up with it.
This project can be adapted for lots of different holidays and occasions – I think I’m going to make these to hand out to my children’s classes as school. Let me know if you try this project yourself – have fun!
Posted by Kathy Torrence on Oct 19, 2007 in
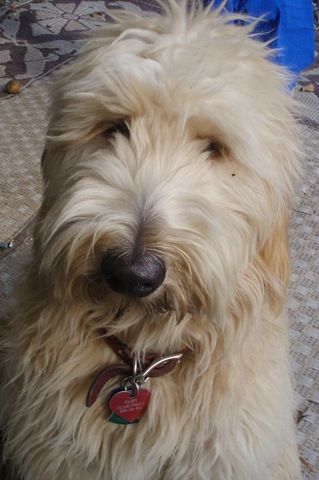
Our Goldendoodle Puppies Our goldendoodle, Daisy, completed her Canine Good Citizen test last night at PetSmart – Mike said she passed with flying colors! The CGC program is offered by the AKC and consists of a ten part test to show that your dog is well trained and is a responsible doggie citizen.
Dogs are tested on:
- Accepting a friendly stranger
- Sitting politely for petting
- Appearance and grooming
- Walking on a loose lead
- Walking through a crowd
- Sit, down and stay on command
- Coming when called
- Reaction to another dog
- Reaction to distraction
- Supervised separation
Now she’ll have a medallion to wear on her collar to show that she’s a CGC – congratulations, Daisy!

Posted by Kathy Torrence on Oct 18, 2007 in
Crafts Our stamp club, Stampers Anonymous, entered a contest in Rubber Stamper magazine some time ago. The contest challenged stamp clubs to all use the same stamp on our own card designs. The winning stamp clubs have been featured in the last three issues of Rubber Stamper, and the Nov/Dec issue has our stamp club featured on page 67.
Here is the photo featured along with the entries:
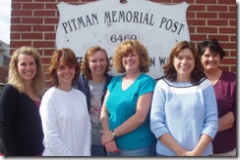
And even more exciting – three of our members had their cards featured with the article! Jennifer Coles, Frani Finocchario and Denise Mennella all have beautiful cards shown along with our photo and description – congratulations, ladies!
Here’s the text of the writeup that accompanies the article:
Stampers Anonymous formed 1 1/2 years ago in Pitman, New Jersey. The 12 members meet on the second Wednesday of the month at their SU demonstrator’s home and a rotating member brings the snacks. Many of them are new to stamping, so a new technique, product or project is introduced at each meeting and everyone does a make-and-take. They’ve traded ATCs, gone on weekend trips, made cards for soldiers in Iraq and local senior citizens, and stamped gifts for school teachers. Recently, they started a stamping/scrapbooking ministry at Pitman United Methodist Church, and proceeds from the $5 admission charge go to Victory House for Girls, a residential home for at-risk teenage girls.
Well…the photo may be lousy, but I really like the writeup, anyway! 🙂
Posted by Kathy Torrence on Oct 18, 2007 in
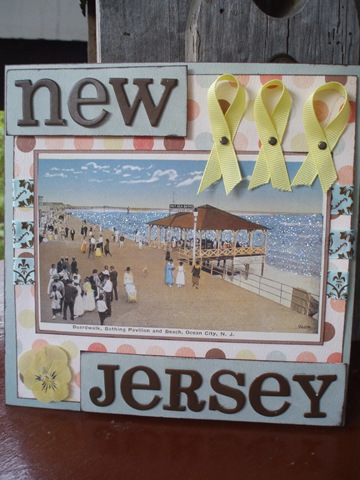
Scrapbooks A few weeks ago, I saw a request on SplitCoastStampers for scrapbook pages. SCS member mom2tysonnashlee was putting together a book for her cousin who is currently serving in Iraq. She was hoping for one 8X8 page from each of the 50 states, and was still missing about 6 states (NJ being one of them).
I volunteered to help her with NJ, and just finished the page yesterday (sorry it took so long, Cara).
Each state’s page will incorporate something from that state. I found a book with beautiful vintage postcards from Ocean City, NJ (one of our favorite vacation spots), so I decided to use one on my layout. 8X8 is not a large page, so I really didn’t have room for much else. Here’s my page:
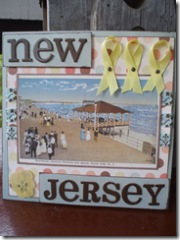
I added Dazzling Diamonds to the water on the postcard and put several ribbons behind it. I used brown chipboard to spell out New Jersey and added some yellow ribbons tacked with brads for the soldier. I also added a small pressed yellow pansy – the yellows pick up the little bit of yellow in the postcard.
I hope they like the page…
Posted by Kathy Torrence on Oct 15, 2007 in
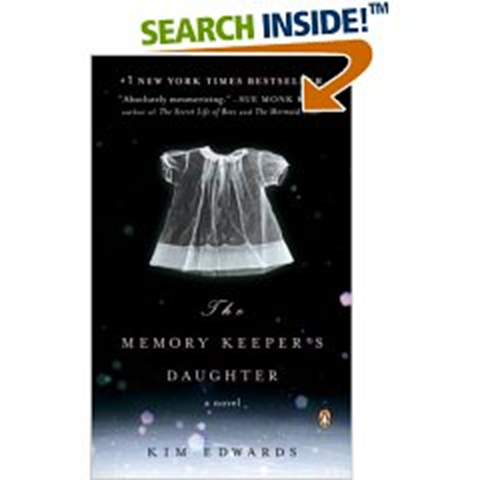
Books I'm Reading Although I missed my book club meeting last week (I was scheduled to be in three places at one time on Thursday night and surprisingly, I could only physically be in one!), I did finish the book selection – The Memory Keeper’s Daughter by Kim Edwards.

The ‘memory keeper’ refers to a camera – and the daughter is the baby girl with Down’s Syndrome that was given away at birth by the baby’s father. The baby was one of a set of boy/girl twins that was delivered by the father during a snowstorm. The boy was delivered healthy – the mother was told that the daughter had died. The nurse was ordered to take the baby girl, Phoebe, away to an institution for the ‘mentally feeble’, but the nurse couldn’t do leave here there and then raises the child as her own.
I know that this book has received some really good reviews and I’m certainly no literary expert, but I didn’t really enjoy it. First, I just could NOT get over what the father had done. I know that the author tried to make us sympathetic toward him (he had a terminally ill sister that died when he was young), but I just couldn’t forgive him or understand not only how he could give that baby away, but also how he could keep it from his wife.
Plus, the book seemed extremely lopsided to me. The beginning was full of extreme, minute detail (a little too flowery for my taste – I’d rather have a story with substance) and then at the end, everything sped up and we were left with few details. It’s like Ms. Edwards realized that the book was going to be too long, so she just compressed the end. All of a sudden and without any detail or information, the father dies. You think that would be worth more detail than the look of the sand and sky on the beach when the mother cheats on him (oops – now I’ve given some of the story away – I wouldn’t recommend reading the book anyway… :).
This was not the worst book I’ve ever read, but certainly not the best. I had to force myself to read the second half of the book – I didn’t care, quite frankly, what happened to any of the characters after that point.
Okay, so now that I’ve finished that book (and that was just my opinion, mind you), I’ve started reading the next book club selection – March by Geraldine Brooks.
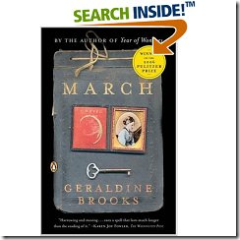
This book follows the absentee father of the March family from Little Women while he is away fighting the Civil War. I haven’t read much yet, but so far, some of the war scenes have been quite gory (but I suppose that’s what war is, isn’t it?). I’ll let you know what I think when I’m finished…
Posted by Kathy Torrence on Oct 15, 2007 in
Family Stuff,
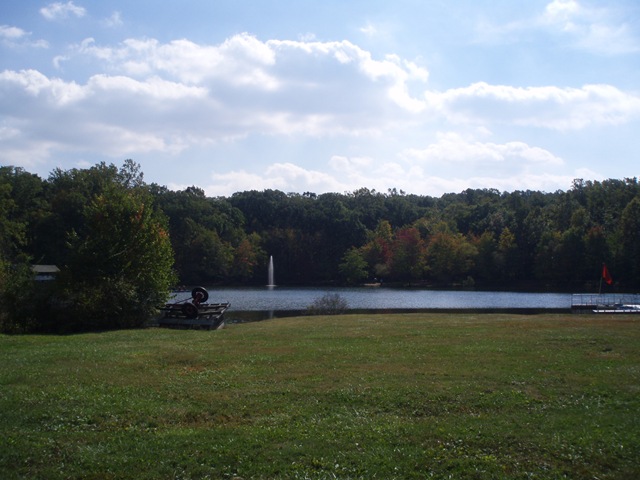
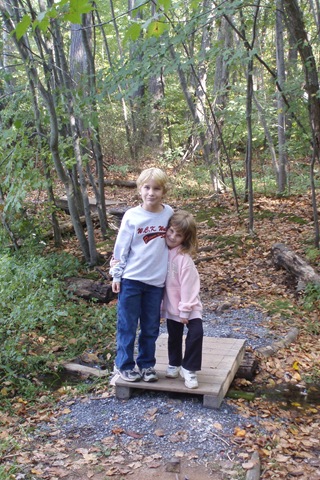
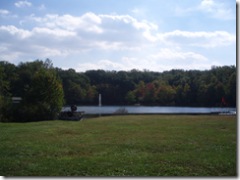
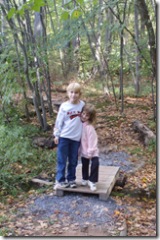
Yardsale Finds We went back to Lake-in-Wood campground for the last of our three ‘No-Tow’ weekends and it was a beautiful one! There was no dog vomit or people influenza involved this weekend, thank goodness!
We managed to take a hike around the lake:
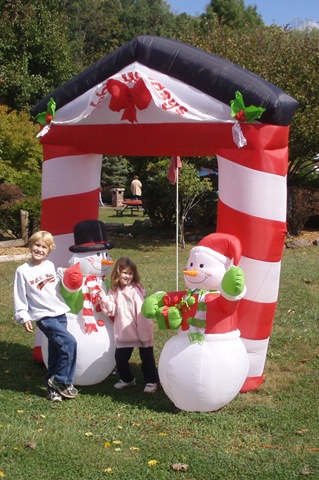
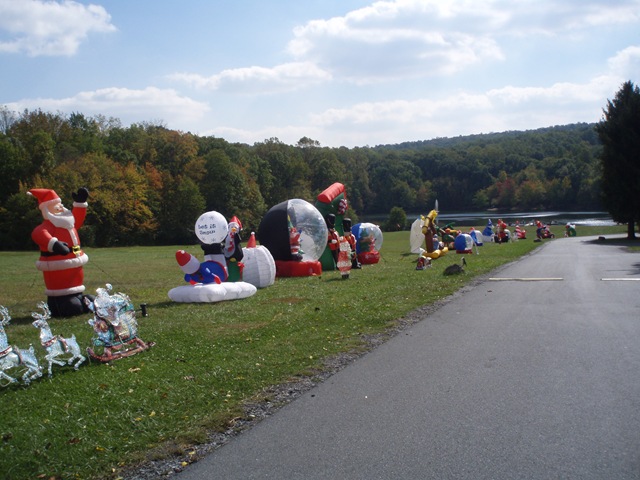
And celebrated “Christmas in October”:

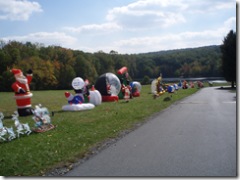
(Apparently, you can celebrate Christmas any time you’d like at campgrounds…)
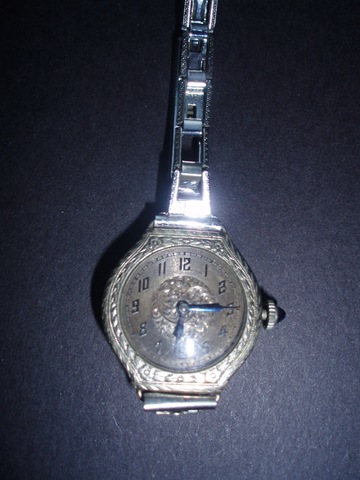
I also managed to escape to Shupp’s Grove by myself for a few hours (FINALLY!) on Saturday morning and found this lovely vintage watch for just $5:

Fortunately, my friend Marie and her husband Steve own Skinner Watch Repair, so I’m hoping they can get it working again.
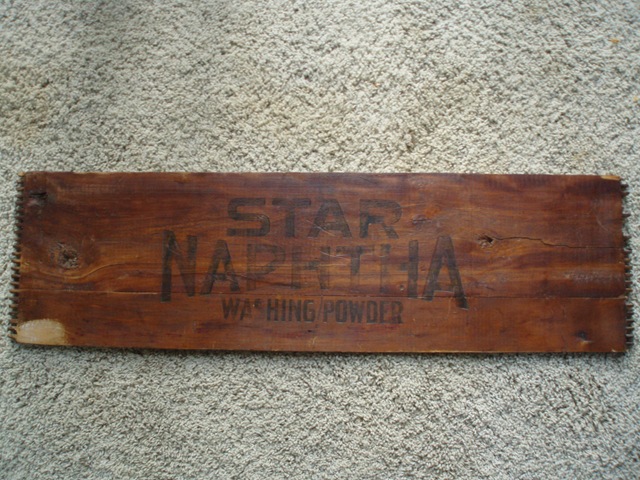
I also picked up this piece:
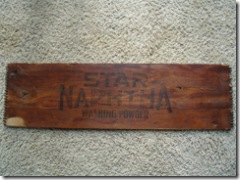
It’s a side to a vintage Star Naptha soap box – I thought this would be great hanging in my kitchen, bathroom or even laundry room. It was just $4.
So…after walking around the antique market for two hours and spending just $9 (I could have spent a LOT more, but I was on a strict budget!), I had a nice, relaxing morning.
I hope to get into my craft room soon – I still haven’t had a chance to put everything away from Stamp Club last Wednesday! It’s just been so busy around here with lots of things at church going on this week…